
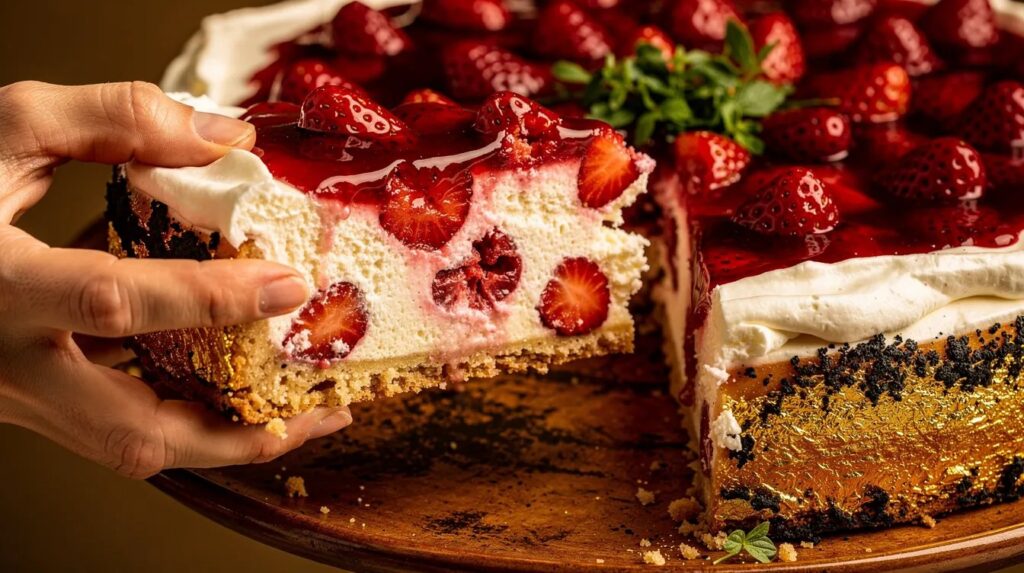
Strawberry season arrives in the Southern Hemisphere just as autumn approaches, but right now — late March in Australia — the tail end of summer still delivers those deep-red, fragrant berries that practically perfume the kitchen the moment you slice them open. This is the cheesecake that takes full advantage of that window. No oven, no fuss, no last-minute scramble before guests arrive.
What makes this version worth bookmarking is its make-ahead nature. You build it the night before, let the fridge do all the work, and pull out a cheesecake that holds its shape, tastes like summer preserved in cream, and slices cleanly without a single crack — because there was never any baking to crack in the first place. A simple biscuit base, a whipped filling laced with real strawberries, and a glossy berry topping that sets like stained glass. Time to clear a shelf in the fridge.
| Preparation | 30 min |
| Chilling | 6 hours (or overnight) |
| Portions | 10–12 slices |
| Difficulty | Easy |
| Cost | $$ |
| Season | Late-summer strawberries, autumn entertaining |
Suitable for: Vegetarian · No-bake
Ingredients
For the biscuit base
- 250 g plain sweet biscuits (Arnott's Marie or Digestives work well)
- 120 g unsalted butter, melted
- 1 tablespoon caster sugar
- Pinch of fine salt
For the strawberry cheesecake filling
- 500 g cream cheese, full-fat, at room temperature
- 150 g caster sugar
- 1 teaspoon pure vanilla extract
- Zest of 1 lemon
- 2 tablespoons lemon juice, freshly squeezed
- 250 g fresh strawberries, hulled and finely chopped
- 3 teaspoons powdered gelatine
- 3 tablespoons warm water
- 300 ml thickened cream (35% fat), cold
For the strawberry glaze
- 200 g fresh strawberries, hulled
- 2 tablespoons caster sugar
- 2 teaspoons powdered gelatine
- 2 tablespoons warm water
Utensils
- 23 cm (9-inch) springform tin
- Food processor or zip-lock bag and rolling pin
- Electric hand mixer or stand mixer
- Fine-mesh sieve
- Small saucepan
- Spatula
Preparation
1. Build the biscuit base
Line the bottom of your springform tin with baking paper — this makes unmoulding far easier later. Blitz the biscuits in a food processor until you have fine, even crumbs with no large chunks remaining. If you don't have a processor, seal them in a sturdy zip-lock bag and crush them with a rolling pin, pressing and rolling until the texture resembles coarse sand. Transfer the crumbs to a bowl, pour in the melted butter, add the sugar and salt, then stir until every crumb is coated and the mixture holds together when pressed between your fingers. Tip it into the tin and press it flat and firm using the back of a spoon or the base of a glass, pushing it slightly up the sides — about 2 cm high — to create a shallow wall that will cradle the filling. Refrigerate for at least 20 minutes while you prepare the filling. A cold, firm base prevents it from crumbling when you pour the cream cheese mixture on top.
2. Bloom the gelatine
Sprinkle the 3 teaspoons of powdered gelatine evenly over the 3 tablespoons of warm water in a small heatproof bowl. Do not stir immediately — let it sit for 5 minutes until it swells and turns spongy. This step is called blooming, and it ensures the gelatine dissolves smoothly without clumps. Once bloomed, microwave in 10-second bursts (or set the bowl over a small pan of simmering water) until the gelatine is completely liquid and clear. It should feel warm but never boil — boiling destroys gelling power. Set aside to cool slightly while you work on the filling.
3. Whip the filling
In a large bowl, beat the room-temperature cream cheese with an electric mixer on medium speed until smooth and free of lumps — roughly 2 minutes. Add the caster sugar, vanilla extract, lemon zest, and lemon juice. Beat again until fully combined and silky. The lemon does two things here: it lifts the richness of the cream cheese and helps the filling taste fresh rather than cloying. Fold in the finely chopped strawberries with a spatula. You want small pieces — no larger than your little fingernail — so they distribute evenly and don't weigh down the mousse.
4. Incorporate cream and gelatine
In a separate chilled bowl, whip the thickened cream to soft peaks — the stage where the cream holds its shape gently but flops over when you lift the whisk. Over-whipping will make the final texture grainy rather than cloud-like, so stop the moment the cream looks billowy. Take the slightly cooled (but still liquid) gelatine and pour it in a thin, steady stream into the cream cheese mixture while beating on low speed. Work quickly — if the gelatine hits cold cream cheese and seizes into strings, the filling will be lumpy. Once incorporated, fold in the whipped cream in three additions using a large spatula: cut down through the centre, sweep along the bottom, fold over the top. Repeat until no white streaks remain. The filling should look pale pink, mousse-like, and hold a gentle mound on the spatula.
5. Fill the tin and chill
Pour the filling over the chilled biscuit base in one go. Use a spatula or the back of a spoon to smooth the surface, working from the centre outward in gentle strokes. Tap the tin firmly on the bench two or three times to release any trapped air bubbles — this gives you a flawless surface once set. Cover loosely with plastic wrap (ensure it doesn't touch the filling) and refrigerate for at least 4 hours. If you plan to add the glaze — and you should — the filling needs to be firm enough to support a liquid layer on top, so patience here pays off.
6. Make the strawberry glaze
While the cheesecake sets, prepare the topping. Place the 200 g of strawberries and 2 tablespoons of sugar in a small saucepan over medium heat. Cook, stirring occasionally, until the berries collapse and release their juice — about 5 minutes. Mash lightly with a fork to break up any large pieces. Push the mixture through a fine-mesh sieve into a clean bowl, pressing firmly to extract every drop of ruby liquid and leaving the seeds behind. You should have roughly 150 ml of smooth, vivid purée. Bloom the remaining 2 teaspoons of gelatine in 2 tablespoons of warm water, dissolve as before, then stir it into the still-warm strawberry purée. Let the glaze cool to room temperature — it should be pourable but not hot, or it will melt the filling underneath.
7. Glaze and set overnight
Once the glaze is cool and the filling firm to the touch, pour the glaze slowly over the centre of the cheesecake. Tilt the tin gently to coax the glaze to the edges in an even layer. If a few small bubbles appear on the surface, pop them with a toothpick. Return the cheesecake to the fridge, uncovered this time for the first 30 minutes so condensation doesn't drip onto the glaze, then cover and chill for at least 2 more hours or, ideally, overnight. The glaze will set to a beautiful, glossy mirror that catches the light when you bring it to the table.
8. Unmould and serve
Run a thin knife or offset spatula around the inside edge of the tin, pressing the blade against the metal — not the cheesecake — to avoid gouging the sides. Release the springform clasp and lift the ring straight up. Slide the cheesecake (still on the base and baking paper) onto a serving plate, or carefully peel the paper and transfer if you prefer. For the cleanest slices, dip a sharp knife in hot water and wipe it dry between each cut. The texture should be creamy and mousse-like, with a biscuit base that snaps gently, and each slice should hold its shape on the plate without slumping.
My chef's tip
For an even more intense strawberry flavour without adding extra liquid to the filling, macerate the chopped strawberries with a tablespoon of sugar for 15 minutes before folding them in. The sugar draws out the juices, which you then drain off and stir into the glaze instead. This concentrates berry flavour in both layers. With autumn approaching, keep this technique in your back pocket for passion fruit or mango versions when citrus and tropical fruits come into full swing across Queensland and northern New South Wales.
Dessert and drinks pairings
A no-bake strawberry cheesecake like this, with its balance of tangy cream cheese and sweet berries, is ideal with something with a touch of effervescence or gentle sweetness to match without overwhelming.
A chilled Tasmanian sparkling rosé brings fine bubbles and red-fruit notes that echo the strawberry topping. If you lean toward still wines, a late-harvest Riesling from the Clare Valley offers honeyed acidity that complements the lemon in the filling. For a non-alcoholic pairing, try a sparkling elderflower cordial over ice with a squeeze of lime — its floral lift and gentle sweetness work beautifully alongside the berries.
About this cheesecake
No-bake cheesecake has roots in the British and Australian tradition of icebox cakes — chilled desserts born from the era when not every household had a reliable oven, but almost everyone had a fridge. The concept is simple: use gelatine or whipped cream (or both) to set a rich filling without heat. In Australia, the no-bake cheesecake became a fixture of suburban entertaining through the 1970s and 1980s, often made with condensed milk, canned fruit, and a packet of jelly crystals. It was homespun, crowd-pleasing, and forgiving.
This version keeps the ease but lifts the quality. Fresh cream cheese replaces condensed milk, real strawberries replace jelly crystals, and a proper glaze adds polish. The make-ahead format still honours the original spirit: assemble when it suits you, serve when it matters. Across New Zealand and South Africa, nearly identical versions appear at barbecues and holiday tables, proof that wherever there are strawberries and a fridge, this dessert earns its place.
Nutritional information (per slice, based on 12 slices, approximate values)
| Nutrient | Amount |
|---|---|
| Calories | ~380 kcal |
| Protein | ~5 g |
| Carbohydrates | ~30 g |
| of which sugars | ~22 g |
| Fat | ~27 g |
| Fibre | ~1 g |
Frequently asked questions
Can i make this cheesecake more than one day ahead?
Yes — this cheesecake holds well in the fridge for up to 3 days. The gelatine structure keeps the filling stable, and the glaze actually improves in appearance after a full overnight set. Cover it loosely with plastic wrap or place it in a large airtight container to prevent it from absorbing fridge odours. Add any fresh strawberry garnish just before serving so the berries don't bleed.
Can i freeze it?
You can freeze the cheesecake without the glaze for up to 4 weeks. Wrap it tightly in plastic wrap and then foil. Thaw overnight in the fridge, then add the freshly made glaze the next morning. Freezing may soften the biscuit base slightly, but the filling holds its texture well.
What if i don't have powdered gelatine?
Leaf (sheet) gelatine works just as well. As a general guide, 3 teaspoons of powdered gelatine is roughly equivalent to 4–5 gold-strength gelatine leaves. Soak the leaves in cold water for 5 minutes until floppy, squeeze out excess water, then dissolve in a small amount of warm liquid before adding to the mixture. The result is identical.
Can i use frozen strawberries?
For the glaze, frozen strawberries work well — they break down quickly and produce plenty of juice. For the filling, thaw them first and drain off excess liquid, then pat dry with paper towel before chopping. The flavour will be good, though the colour may be slightly less vibrant than peak-season fresh fruit.
What are some seasonal variations?
As Australian autumn progresses, swap strawberries for passionfruit pulp in the filling and glaze — reduce the sugar slightly as passionfruit carries its own tartness. In winter, a blood orange version with zest and juice in the filling and a ruby-red citrus glaze is striking. Come spring, mango and lime makes a tropical take that sets beautifully with the same gelatine method.