
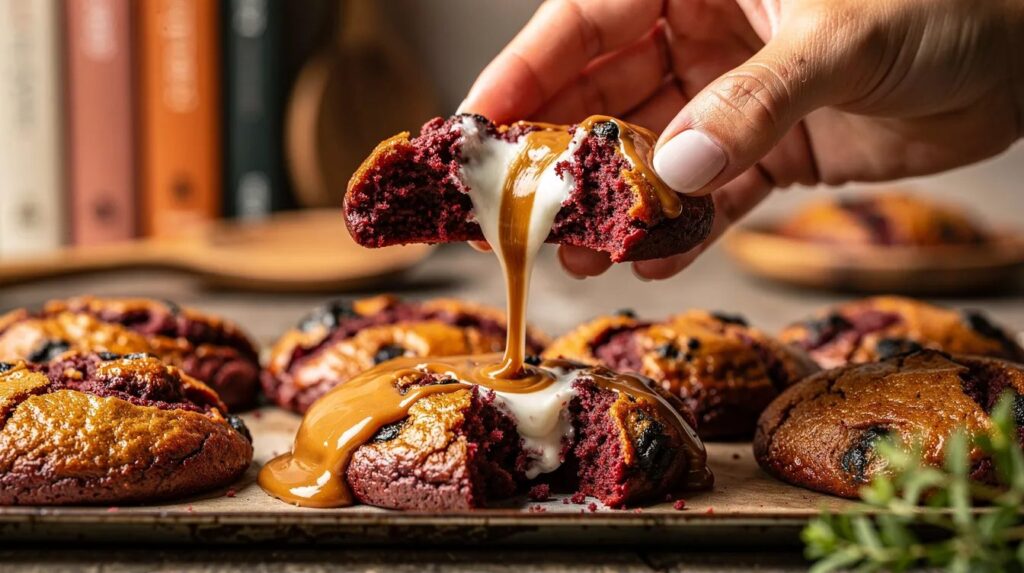
Red velvet meets cookie dough in a recipe so stripped-back it almost feels like cheating. Four ingredients, no mixer, no chilling time — just a bowl, a spoon, and about twelve minutes in the oven. What comes out is a cookie with a crackled, papery crust that shatters at first bite, giving way to a molten centre of white chocolate that pools and stretches between your fingers. The colour is deep burgundy, the kind that looks particularly striking stacked on a wire rack against a kitchen bench.
This recipe leans on a box of red velvet cake mix to do the heavy lifting — providing the cocoa flavour, the signature tint, and the dry structure all in one hit. You add eggs, butter, and chunks of white chocolate, and that is genuinely it. The result sits somewhere between a brownie and a cookie: dense, fudgy in the middle, with just enough chew around the edges. Grab an apron and a baking tray, because this one moves fast.
| Preparation | 10 min |
| Baking | 12 min |
| Portions | 16 cookies |
| Difficulty | Easy |
| Cost | $ |
Suitable for: Vegetarian
Ingredients
- 1 box (500 g) red velvet cake mix
- 2 large eggs, at room temperature
- 80 g unsalted butter, melted and cooled slightly
- 150 g white chocolate, roughly chopped into irregular chunks
Utensils
- Large mixing bowl
- Whisk or fork
- Spatula or wooden spoon
- Baking tray
- Baking paper
- Wire cooling rack
Preparation
1. Preheat and prepare the tray
Set your oven to 175 °C (160 °C fan-forced). Line a large baking tray with baking paper, letting the paper overhang the edges slightly so nothing sticks. If you only have one tray, plan to bake in two batches — these cookies need space. Leave roughly 5 cm between each ball of dough, because they spread as the butter melts and the structure sets. While the oven heats, move on to the dough.
2. Combine the wet ingredients
Crack both eggs into a large bowl and whisk them until the yolks and whites are fully incorporated — about 30 seconds with a fork. Pour in the melted butter in a slow stream, stirring as you go. You want a smooth, glossy liquid with no visible streaks of fat sitting on top. The butter should be warm but not hot; if it is too hot it will begin to cook the eggs and you will end up with scrambled flecks through your dough. Lukewarm to the touch is the target.
3. Add the cake mix
Tip the entire box of red velvet cake mix into the bowl. Use a spatula or wooden spoon to fold everything together. The dough will feel unusually thick and slightly sticky — somewhere between cookie dough and brownie batter. Resist the urge to add liquid. Stir until no dry pockets of powder remain, scraping down the sides as you go. A few small lumps are fine; they will dissolve in the oven. The colour should be a uniform deep red-brown, rich and vivid.
4. Fold in the white chocolate
Scatter the chopped white chocolate over the dough and fold it through with four or five broad strokes of the spatula. You want chunks distributed throughout, not crushed into the batter. Aim for a mix of sizes — some pieces the size of a fingernail, others closer to a small grape. The smaller pieces will melt fully during baking, creating pockets of gooey sweetness inside the cookie, while the larger chunks will soften and hold their shape, giving you that satisfying stretch when you pull a warm cookie apart.
5. Portion and shape the dough
Scoop roughly 1½ tablespoons of dough per cookie and roll each portion loosely between your palms into a ball. Do not compress them tightly — a slightly shaggy surface bakes into a more dramatic crackle pattern on top. Place the balls onto the prepared tray, leaving that 5 cm gap. You should fit about 8 cookies per standard Australian baking tray. If the dough sticks to your hands, dampen your palms with a little cold water.
6. Bake until crackled but still soft
Slide the tray into the centre of the oven and bake for 10–12 minutes. The cookies are ready when the tops have formed a network of fine cracks and the surface looks dry and set, but the centres still appear slightly underdone — almost shiny. They will feel very soft if you press them gently; this is exactly what you want. They firm up significantly as they cool. Pulling them out too early is better than too late: an extra minute can take them from fudgy to cakey. Remove the tray from the oven and let the cookies sit on the tray for 5 full minutes before transferring them to a wire rack. This resting time allows the internal structure to set without drying out.
My chef's tip
For an even gooier centre, press one or two extra chunks of white chocolate into the top of each dough ball just before they go into the oven. The chocolate on top melts into a visible, glossy pool that makes the cookies look bakery-worthy. If you can get your hands on Callebaut or Lindt white chocolate rather than compound cooking chocolate, the flavour difference is stark — real cocoa butter melts more slowly and tastes of vanilla and cream rather than pure sugar. Store any leftover dough balls in the freezer on a lined tray, then transfer to a zip-lock bag once solid. They bake from frozen in about 14 minutes, so you are only ever quarter of an hour away from a warm cookie.
Dessert and drink pairings
These cookies sit in sweet, buttery territory with a gentle cocoa backbone, so the best pairings are drinks that either contrast with acidity or lean into the richness. A cold glass of full-cream milk is the classic and honestly hard to beat — the fat in the milk rounds out the sweetness and washes the fudgy crumb clean.
For something more grown-up, try a small cup of espresso or a flat white made with a medium roast. The bitterness of coffee cuts through the white chocolate beautifully. If you prefer tea, a strong pot of English Breakfast or a spiced chai works well. For an indulgent evening option, a dessert wine such as a late-harvest Riesling from the Clare Valley or a chilled Moscato from the King Valley offers enough acidity to balance the sweetness without overwhelming the delicate cocoa notes.
More about red velvet
Red velvet cake has roots in the American South, with recipes appearing as early as the 1920s. The original red hue came not from food colouring but from a chemical reaction between natural cocoa powder — which contains anthocyanins — and the acid in buttermilk or vinegar. When baking companies began producing Dutch-processed cocoa, which strips those anthocyanins, bakers started adding red dye to preserve the colour people had come to expect. By the mid-20th century, red velvet had become a celebration cake across the southern United States, often layered with cream cheese frosting.
The flavour profile is subtler than a standard chocolate cake: less cocoa, a faint tang from the buttermilk, and a texture often described as velvety — fine-crumbed and tender. In cookie form, the proportions shift. More butter and less liquid create a denser, chewier result. Pairing red velvet with white chocolate rather than the traditional cream cheese frosting is a more recent twist, popular in Australian and American bakeries alike, that plays on the contrast between the mild bitterness of cocoa and the creamy sweetness of white chocolate.
Nutritional information (per cookie, approximate values)
| Nutrient | Amount |
|---|---|
| Calories | ~185 kcal |
| Protein | ~2 g |
| Carbohydrates | ~27 g |
| of which sugars | ~17 g |
| Fat | ~8 g |
| Fibre | ~0.5 g |
Frequently asked questions
Can I make the dough ahead of time?
Yes. The dough keeps well in the fridge for up to 48 hours, covered tightly with cling film. Cold dough spreads less during baking, so the cookies will be slightly thicker and puffier — still delicious, just a different texture. You can also freeze pre-portioned dough balls for up to three months. Bake them straight from the freezer, adding two to three extra minutes to the bake time.
How should I store baked cookies?
Once completely cool, layer them between sheets of baking paper in an airtight container. They stay soft and chewy at room temperature for three to four days. If they firm up, a quick 10-second blast in the microwave brings back the gooey centre. Avoid the fridge for storage — it dries out cookies faster than you might expect.
Can I use milk or dark chocolate instead of white?
Absolutely. Dark chocolate with around 50–60% cocoa adds a deeper, more intense flavour and a pleasant bitterness that works well against the sweet cake mix base. Milk chocolate is a crowd-pleaser, especially with younger eaters. You can also mix all three for a triple-chocolate version. Keep the total weight at 150 g regardless of which type you use.
What if I don't have red velvet cake mix?
A chocolate or devil's food cake mix will give you the same texture, just without the red colour. If appearance matters, add ½ teaspoon of red gel food colouring to the wet ingredients before folding in the dry mix. Gel colouring is more concentrated and won't thin the dough the way liquid colouring can.
Why are my cookies flat and crispy rather than gooey?
The most common cause is overbaking. These cookies should come out of the oven looking slightly underdone — soft, puffy, and almost wet in the centre. They set as they cool on the tray. Other culprits include using a tray that is too dark (which absorbs more heat) or an oven that runs hot. An oven thermometer is a small investment that solves a lot of baking mysteries.
Red velvet meets cookie dough in a recipe so stripped-back it almost feels like you’re cheating. Four ingredients, no mixer, no chilling time — just a bowl, a spoon, and about twelve minutes in the oven. What emerges is a cookie with a crackled, papery crust that shatters upon the first bite, giving way to a molten centre of white chocolate that pools and stretches between your fingers. The colour is a deep burgundy, the kind that looks particularly striking when stacked on a wire rack against a kitchen bench.
This recipe relies on a box of red velvet cake mix to do the heavy lifting — providing the cocoa flavour, the signature tint, and the dry structure all in one go. Simply add eggs, butter, and chunks of white chocolate, and that's genuinely it. The result is something between a brownie and a cookie: dense, fudgy in the middle, with just enough chew around the edges. So, grab an apron and a baking tray, because this recipe is quick to make.
| Preparation | 10 mins |
| Baking | 12 mins |
| Servings | 16 cookies |
| Difficulty | Easy |
| Cost | $ |
Suitable for: Vegetarian
Ingredients
- 1 box (500 g) red velvet cake mix
- 2 large eggs, at room temperature
- 80 g unsalted butter, melted and cooled slightly
- 150 g white chocolate, roughly chopped into irregular chunks
Utensils
- Large mixing bowl
- Whisk or fork
- Spatula or wooden spoon
- Baking tray
- Baking paper
- Wire cooling rack
Preparation
1. Preheat and prepare the tray
Preheat your oven to 175 °C (160 °C fan-forced). Line a large baking tray with baking paper, letting the paper overhang the edges slightly so nothing sticks. If you only have one tray, plan to bake in two batches — these cookies need space. Leave roughly 5 cm between each ball of dough, as they will spread as the butter melts and the structure sets. While the oven heats, move on to the dough.
2. Combine the wet ingredients
Crack both eggs into a large bowl and whisk them until the yolks and whites are fully incorporated — about 30 seconds with a fork. Pour in the melted butter in a slow stream, stirring as you go. You want a smooth, glossy liquid with no visible streaks of fat sitting on top. The butter should be warm but not hot; if it's too hot, it will start to cook the eggs, and you'll end up with scrambled flecks through your dough. Lukewarm to the touch is ideal.
3. Add the cake mix
Tip the entire box of red velvet cake mix into the bowl. Use a spatula or wooden spoon to fold everything together. The dough will feel unusually thick and slightly sticky — somewhere between cookie dough and brownie batter. Avoid adding liquid. Stir until no dry pockets of powder remain, scraping down the sides as you go. A few small lumps are fine; they will dissolve in the oven. The colour should be a uniform deep red-brown, rich and vibrant.
4. Fold in the white chocolate
Scatter the chopped white chocolate over the dough and fold it through with four or five broad strokes of the spatula. You want the chunks distributed throughout, not crushed into the batter. Aim for a mix of sizes — some pieces the size of a fingernail, others closer to a small grape. The smaller pieces will melt fully during baking, creating pockets of gooey sweetness inside the cookie, while the larger chunks will soften and hold their shape, giving you that satisfying stretch when you pull a warm cookie apart.
5. Portion and shape the dough
Scoop roughly 1½ tablespoons of dough per cookie and roll each portion loosely between your palms into a ball. Do not compress them tightly — a slightly shaggy surface bakes into a more dramatic crackle pattern on top. Place the balls onto the prepared tray, leaving that 5 cm gap. You should fit about 8 cookies per standard Australian baking tray. If the dough sticks to your hands, dampen your palms with a little cold water.
6. Bake until crackled but still soft
Slide the tray into the centre of the oven and bake for 10–12 minutes. The cookies are ready when the tops have formed a network of fine cracks and the surface looks dry and set, but the centres still appear slightly underdone — almost shiny. They will feel very soft if you press them gently; this is exactly what you want. They firm up significantly as they cool. It's better to pull them out too early than too late: an extra minute can take them from fudgy to cakey. Remove the tray from the oven and let the cookies sit on the tray for 5 full minutes before transferring them to a wire rack. This resting time allows the internal structure to set without drying out.
My chef's tip
For an even gooier centre, press one or two extra chunks of white chocolate into the top of each dough ball just before they go into the oven. The chocolate on top melts into a visible, glossy pool that makes the cookies look bakery-worthy. If you can get your hands on Callebaut or Lindt white chocolate rather than compound cooking chocolate, the flavour difference is stark — real cocoa butter melts more slowly and tastes of vanilla and cream rather than pure sugar. Store any leftover dough balls in the freezer on a lined tray, then transfer to a zip-lock bag once solid. They bake from frozen in about 14 minutes, so you’re only ever fifteen minutes away from a warm cookie.
Dessert and drink pairings
These cookies are sweet and buttery with a gentle cocoa undertone, so the best pairings are drinks that either contrast with some acidity or complement the richness. A cold glass of full-cream milk is the classic and honestly hard to beat — the fat in the milk rounds out the sweetness and cleanses the fudgy crumbs away.
For something more "grown-up", try a small cup of espresso or a flat white made with a medium roast. The bitterness of the coffee cuts through the white chocolate beautifully. If you prefer tea, a strong pot of English Breakfast or a spiced chai works well. For an indulgent evening option, a dessert wine such as a late-harvest Riesling from the Clare Valley or a chilled Moscato from the King Valley offers enough acidity to balance the sweetness without overwhelming the delicate cocoa notes.
More about red velvet
Red velvet cake has roots in the American South, with recipes appearing as early as the 1920s. The original red hue came not from food colouring, but from a chemical reaction between natural cocoa powder — which contains anthocyanins — and the acid in buttermilk or vinegar. When baking companies began producing Dutch-processed cocoa, which strips those anthocyanins, bakers started adding red dye to maintain the colour people had come to expect. By the mid-20th century, red velvet had become a celebration cake across the southern United States, often layered with cream cheese frosting.
The flavour profile is subtler than a standard chocolate cake: less cocoa, a faint tang from the buttermilk, and a texture often described as velvety — fine-crumbed and tender. In cookie form, the proportions shift. More butter and less liquid create a denser, chewier result. Pairing red velvet with white chocolate rather than the traditional cream cheese frosting is a more recent twist, popular in Australian and American bakeries alike, that plays on the contrast between the mild bitterness of cocoa and the creamy sweetness of white chocolate.
Nutritional information (per cookie, approximate values)
| Nutrient | Amount |
|---|---|
| Calories | ~185 kcal |
| Protein | ~2 g |
| Carbohydrates | ~27 g |
| of which sugars | ~17 g |
| Fat | ~8 g |
| Fibre | ~0.5 g |
Frequently asked questions
Can I make the dough ahead of time?
Yes. The dough keeps well in the fridge for up to 48 hours, covered tightly with cling film. Cold dough spreads less during baking, so the cookies will be slightly thicker and puffier — still delicious, but with a slightly different texture. You can also freeze pre-portioned dough balls for up to three months. Bake them straight from the freezer, adding two to three extra minutes to the baking time.
How should i store baked cookies?
Once completely cool, layer them between sheets of baking paper in an airtight container. They stay soft and chewy at room temperature for three to four days. If they firm up, a quick 10-second blast in the microwave brings back the gooey centre. Avoid storing in the fridge — it dries out cookies faster than you might expect.
Can I use milk or dark chocolate instead of white?
Absolutely. Dark chocolate with around 50–60% cocoa adds a deeper, more intense flavour and a pleasant bitterness that works well against the sweet cake mix base. Milk chocolate is always a favourite, especially with younger eaters. You can also mix all three for a triple-chocolate version. Keep the total weight at 150 g regardless of which type you use.
What if I don't have red velvet cake mix?
A chocolate or devil's food cake mix will give you a similar texture, just without the red colour. If appearance is important, add ½ teaspoon of red gel food colouring to the wet ingredients before folding in the dry mix. Gel colouring is more concentrated and won't thin the dough as much as liquid colouring would.
Why are my cookies flat and crispy rather than gooey?
The most common cause is overbaking. These cookies should come out of the oven looking slightly underdone — soft, puffy, and almost wet in the centre. They set as they cool on the tray. Other causes include using a tray that is too dark (which absorbs more heat) or an oven that runs hot. An oven thermometer is a small investment that solves a lot of baking mysteries.