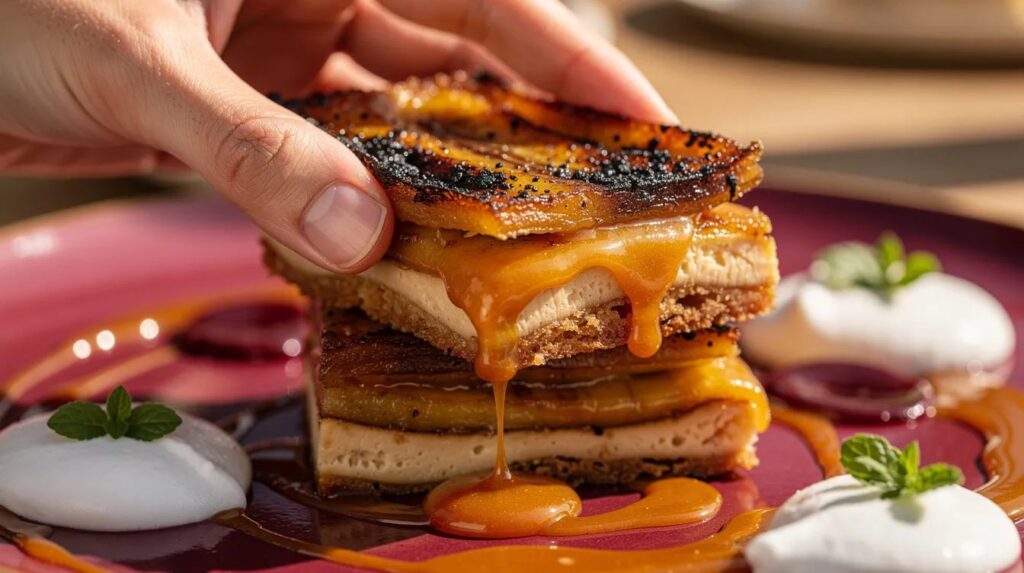
There's something about the shift into warmer weather that makes you crave desserts with a little more personality — less heavy pastry, more soft custard, ripe fruit, and that golden, almost toffee-like sweetness you get from bananas cooked low and slow. These caramelised banana pudding bars hit that exact note. They sit somewhere between a classic banana pudding and a baked cheesecake bar, with a buttery biscuit base, a thick vanilla custard layer rippled with deeply caramelised bananas, and a crown of barely torched meringue. The whole thing sets up in the fridge and slices cleanly into bars you can eat with your hands — no spoon, no bowl, no fuss.
What makes this version worth returning to, week after week through spring, is the caramelisation step. Rather than folding raw banana into the custard and hoping for the best, you cook sliced bananas in brown butter and brown sugar until they turn jammy and dark, almost like a rough banana toffee. That concentrated flavour carries through the entire bar. The base is a simple vanilla wafer crumb crust — firm enough to hold its shape, sandy enough to crumble against your teeth. And the meringue on top is entirely optional, but once you try it, you won't skip it again. Time to clear a shelf in the fridge and line a tin.
| Preparation | 30 min |
| Cooking | 25 min |
| Chilling | 4 hours (minimum) |
| Portions | 12 bars |
| Difficulty | Medium |
| Cost | $$ |
| Season | Ripe bananas, vanilla, spring entertaining |
Suitable for: Vegetarian
Ingredients
For the biscuit base
- 200 g vanilla wafer biscuits (such as Nilla Wafers or similar)
- 80 g unsalted butter, melted
- 1 tablespoon brown sugar
- Pinch of fine salt
For the caramelised bananas
- 4 ripe bananas, sliced into 1 cm rounds
- 50 g unsalted butter
- 60 g dark brown sugar
- 1 teaspoon vanilla extract
- Pinch of flaky sea salt
For the custard filling
- 400 ml full-cream milk
- 200 ml thickened cream
- 4 egg yolks
- 100 g caster sugar
- 40 g cornflour
- 2 teaspoons vanilla bean paste
- 30 g unsalted butter, cold, cubed
For the meringue topping
- 3 egg whites
- 150 g caster sugar
- ½ teaspoon cream of tartar
Utensils
- 23 × 33 cm baking tin (or similar rectangular tin)
- Baking paper
- Medium heavy-based saucepan
- Non-stick frying pan
- Whisk
- Electric hand mixer or stand mixer
- Kitchen torch (optional but recommended)
- Spatula
Preparation
1. Press the biscuit base
Preheat your oven to 170°C. Line the baking tin with baking paper, leaving an overhang on two sides — this is your handle for lifting the bars out later. Blitz the vanilla wafers in a food processor until you have fine, even crumbs. If you don't have a processor, seal them in a zip-lock bag and crush with a rolling pin; a few slightly coarser pieces are fine and add texture. Tip the crumbs into a bowl, add the melted butter, brown sugar and salt, then stir until every crumb is coated and the mixture looks like wet sand. Press it firmly and evenly into the base of the lined tin using the flat bottom of a glass or measuring cup — really compact it, because a loose base will crumble when you try to slice. Bake for 10–12 minutes until the edges smell toasty and the surface has darkened a shade. Set aside to cool completely while you build the other layers.
2. Caramelise the bananas
Place a non-stick frying pan over medium heat and add the butter. Let it melt and foam, then continue cooking until the milk solids at the bottom of the pan turn a nutty amber colour — this is beurre noisette, brown butter, and it adds a deep, almost hazelnut-like flavour to the fruit. Sprinkle in the dark brown sugar and stir until it dissolves into the butter, creating a loose caramel. Lay the banana slices into the pan in a single layer. Resist the urge to move them for a full two minutes — you want the underside to pick up real colour, almost blackened at the edges. Flip each slice and cook for another 90 seconds. The bananas should be soft, deeply golden, and sitting in a thick, syrupy sauce. Add the vanilla extract and sea salt, stir gently, then scrape the entire contents of the pan into a bowl. Let it cool to room temperature. Some slices will break apart — that's fine, even desirable. You want a mix of jammy chunks and smooth caramel.
3. Make the custard filling
In a medium heavy-based saucepan, whisk together the egg yolks, caster sugar and cornflour until smooth and pale — about one minute of vigorous whisking. Pour in the milk and cream gradually, whisking constantly to prevent lumps. Add the vanilla bean paste. Set the pan over medium-low heat and stir continuously with a spatula or wooden spoon, scraping the bottom and edges of the pan where custard tends to catch first. After about 8–10 minutes, the mixture will thicken suddenly and dramatically — it goes from liquid to a thick, glossy custard that holds a trail when you lift the spatula. Keep stirring for another 60 seconds after it thickens to cook out any residual starchy taste. Remove from the heat immediately and stir in the cold butter cubes, one at a time, until each is melted and the custard is glossy and silky. The butter enriches the texture and gives the filling a rounded, almost cream-cheese-like body once chilled.
4. Assemble and chill
Spoon roughly two-thirds of the caramelised banana mixture over the cooled biscuit base, spreading it into an even layer. Pour the warm custard directly over the bananas and use an offset spatula — or the back of a spoon — to smooth the surface. Drop the remaining caramelised banana in spoonfuls across the top, then use a knife or skewer to swirl it lightly through the custard. You're after a marbled effect, not a fully mixed one — visible ribbons of dark banana caramel against pale vanilla custard. Press a sheet of cling film directly onto the surface of the custard to prevent a skin from forming. Refrigerate for a minimum of 4 hours, though overnight is better. The bars need to be properly cold and set to slice cleanly.
5. Make the meringue and finish
When you're ready to serve, prepare the meringue. Place the egg whites and cream of tartar in a spotlessly clean bowl and beat with an electric mixer on medium speed until soft peaks form. Increase to high speed and add the sugar one tablespoon at a time, beating for about 10 seconds between each addition. Continue beating until the meringue is thick, glossy and holds stiff, sculptural peaks — rub a little between your fingers, and it should feel smooth, not gritty. Peel the cling film off the set custard. Dollop the meringue over the top and spread it into peaks and swirls using the back of a spoon. Use a kitchen torch to brown the meringue, holding the flame 5–8 cm from the surface and moving in steady strokes until you get patches of deep bronze and gold. If you don't own a torch, a few minutes under a very hot grill works — watch it constantly, as it goes from perfect to charred in seconds. Lift the slab out of the tin using the paper overhang and slice into 12 bars with a sharp knife dipped in hot water between cuts.
My chef's tip
The quality of this recipe lives and dies with the banana caramelisation. Choose bananas that are ripe — spotted skin, soft flesh — but not mushy. Underripe bananas won't release enough sugar to caramelise properly, and overripe ones disintegrate before they colour. If your bananas aren't quite there yet, leave them in a paper bag with an apple for a day or two. And don't crowd the pan: cook in two batches if needed. Bananas release moisture as they cook, and too many in the pan at once will steam rather than caramelise, leaving you with a pale, flavourless mush instead of that deep, toffee-dark result you're after.
Dessert and drink pairings
These bars are rich, sweet and vanilla-forward with a pronounced caramel backbone — you want a drink that either cuts through that richness or echoes it without tipping into cloying territory.
A tawny port with its own notes of butterscotch and dried fruit is a natural companion, particularly a 10-year tawny served slightly chilled. For something lighter, a late-harvest Riesling from the Clare Valley or Eden Valley offers bright acidity against the custard's weight. If you'd rather skip the alcohol, a strong cold-brew coffee — black, no sugar — works beautifully, its bitterness acting as a counterpoint to every sweet, creamy layer in the bar.
More about this dessert
Banana pudding is a fixture of the American South — a layered dessert of vanilla wafers, sliced bananas and custard, traditionally topped with meringue or whipped cream. Its origins trace back to the late 19th century, with recipes appearing in American cookbooks from the 1880s onward, though the version most people recognise — built around Nilla Wafers — became widespread in the mid-20th century when the wafer brand printed the recipe on its packaging. The genius of the original lies in its simplicity: soft biscuits, cold custard, raw banana, layered and left to meld in the fridge.
Turning it into a bar format borrows from the American tradition of slab desserts — sheet cakes, blondies, magic bars — where everything bakes or sets in one tin and gets sliced for sharing. The caramelisation step is a modern riff that solves the one weakness of classic banana pudding: raw bananas that oxidise and turn grey after a few hours. By cooking the fruit first, you lock in both colour and flavour, and you gain a layer of complexity — brown butter, dark sugar, vanilla — that raw banana simply can't deliver. These bars sit comfortably on a spring picnic table, at a weekend barbecue warm-up, or on an afternoon tea spread when the weather is finally warm enough to eat outside again.
Nutritional values (per bar, approximate values)
| Nutrient | Amount |
|---|---|
| Calories | ~340 kcal |
| Protein | ~5 g |
| Carbohydrates | ~45 g |
| of which sugars | ~32 g |
| Fat | ~16 g |
| Fibre | ~1 g |
Frequently asked questions
Can these bars be made ahead of time?
The base, caramelised bananas and custard can all be assembled up to two days in advance and kept covered in the fridge. Hold off on the meringue until just before serving — it softens and weeps after a few hours. If you're transporting these to a gathering, bring the meringue ingredients separately and torch on-site, or simply top the bars with a generous cloud of softly whipped cream instead.
How should I store leftovers?
Cover the bars tightly with cling film or transfer to an airtight container and refrigerate for up to 3 days. The biscuit base will soften slightly over time, which some people actually prefer — it takes on a cake-like quality as it absorbs moisture from the custard. The meringue won't survive storage well, so either scrape it off or accept a slightly deflated topping.
What can I use instead of vanilla wafers?
Digestive biscuits, shortbread, or even graham crackers all work as a base. Each brings a slightly different flavour — digestives are more wholemeal and malty, shortbread is richer and butterier. Adjust the melted butter quantity slightly: drier biscuits may need an extra tablespoon to bind properly. Crush them the same way and press just as firmly.
Can I make these without a kitchen torch?
Place the assembled bars under a preheated oven grill set to high, positioning the tin about 10 cm from the element. Watch without blinking — the meringue browns in 60–90 seconds and burns quickly. Rotate the tin halfway through for even colour. Alternatively, skip the meringue entirely and top with lightly sweetened whipped cream and a scattering of crushed vanilla wafers for texture.
Can I freeze these bars?
Freeze the bars without the meringue topping. Wrap individual bars tightly in cling film, then foil, and freeze for up to one month. Thaw overnight in the fridge before serving. The custard holds its texture well after freezing, though the banana layer may soften slightly. Add fresh meringue or whipped cream after thawing.