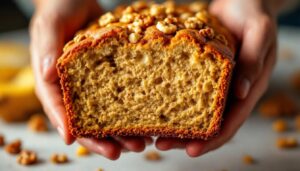
Late March carries that particular restlessness — the days are stretching, the light is returning, and there is a distinct pull toward the kitchen that has nothing to do with necessity and everything to do with comfort. Chocolate chip cookies sit at the center of that impulse: familiar, forgiving, and capable of filling a room with a smell that stops everything. Yet the standard version, however reliable, leaves something on the table. One technique — browning the butter before mixing — shifts the entire flavour profile from sweet and pleasant to something noticeably deeper, with notes of toasted hazelnut, caramel, and roasted grain woven through every bite.
This recipe isn't a reinvention. It keeps the proportions and spirit of the classic intact while applying a single professional technique that pastry cooks have long used to add complexity without adding ingredients. The batter is easy to make, the margin for error is small, and the result is a cookie with a slightly crisp edge, a center that stays soft for days, and a flavour that is harder to place — in the best sense. Once the butter browns, everything else falls into place quickly. Time to get started.
| Preparation | 20 min |
| Resting | 30 min (minimum, dough chilling) |
| Cooking | 11–13 min per tray |
| Yield | ~24 cookies |
| Difficulty | Easy |
| Cost | $ |
| Season | Year-round · particularly suited to spring baking |
Suitable for: Vegetarian
Ingredients
- 225 g (2 sticks / 1 cup) unsalted butter, cut into cubes
- 220 g (1 cup, firmly packed) dark brown sugar
- 100 g (½ cup) granulated white sugar
- 2 large eggs, at room temperature
- 1 egg yolk, at room temperature
- 2 tsp pure vanilla extract
- 270 g (2¼ cups) all-purpose flour
- 1 tsp baking soda
- 1 tsp fine sea salt
- 340 g (2 cups / 12 oz) dark chocolate chips or roughly chopped dark chocolate (60–70% cacao)
- Flaky sea salt (such as Maldon), to finish
Equipment
- Light-coloured saucepan (stainless or enamelled — essential for monitoring colour)
- Large heatproof mixing bowl
- Whisk
- Wooden spoon or silicone spatula
- Kitchen scale
- Two baking sheets
- Parchment paper
- Cookie scoop or tablespoon
- Wire cooling rack
- Instant-read thermometer (optional but useful)
Preparation
1. Brown the butter
Place the cubed butter in a light-coloured saucepan over medium heat. A light-coloured pan is not a stylistic choice — it is the only way to accurately track the colour change happening at the bottom, where the milk solids are toasting. Stir continuously with a wooden spoon, scraping the base of the pan, as the butter melts, foams, and then quietens. After approximately 5 to 7 minutes, a second, more vigorous foam will appear. This signals that the water in the butter has nearly evaporated and the milk solids are beginning to colour. Watch carefully: the transition from golden to amber to dark brown takes only seconds. You are looking for a deep amber colour and small dark specks at the bottom of the pan, with an aroma that is distinctly nutty — warm, toasted, reminiscent of hazelnuts. Remove from heat immediately and pour every drop, including the toasted solids, into your large heatproof mixing bowl. Those solids are pure concentrated flavour; none should be left behind. Allow the browned butter to cool for 10 minutes — it should be warm but not scorching hot when you add the sugars.
2. Combine the sugars and browned butter
Add both the dark brown sugar and the granulated white sugar to the warm browned butter. Whisk vigorously for about 2 minutes until the mixture is fully combined and slightly lightened in colour. The warmth of the butter begins to dissolve the sugars and initiates a light creaming effect — the process by which sugar crystals incorporate air and fat, contributing to structure. The dark brown sugar, with its high molasses content, amplifies the caramel notes already present from the browning. You will notice the mixture smells extraordinary at this point; that is accurate.
3. Add the eggs and vanilla
Add the two whole eggs, the additional yolk, and the vanilla extract. Whisk briskly for a full 60 to 90 seconds. The extra yolk adds fat and richness without additional moisture, resulting in a denser, more tender crumb. Whisking thoroughly here is important: you are building the emulsion that will hold the batter together and give the finished cookie its characteristic chew. The mixture should look smooth, glossy, and slightly thickened, similar in consistency to a light ruban — the ribbon stage used in classical pastry, where batter falls from the whisk in a slow, continuous stream.
4. Add the dry ingredients
Add the flour, baking soda, and fine sea salt directly to the bowl. Switch to a spatula and fold until just combined — meaning no dry streaks remain but you have not overworked the batter. Overmixing at this stage develops gluten excessively, which pushes the texture of the final cookie toward tough and chewy in the wrong direction. The dough will be thick and cohesive. Fold in the chocolate chips or chopped chocolate last, distributing them evenly through the dough.
5. Rest the dough
Cover the bowl and refrigerate the dough for a minimum of 30 minutes, though one to two hours produces a noticeably better result. Chilling firms the fat and slows the spread of the cookies during baking, giving them more structure and a slightly thicker profile. It also allows the flour to fully hydrate and the flavours to meld. If you have the time, the dough can be refrigerated overnight — this extended rest deepens the butterscotch and toffee notes considerably.
6. Shape and bake
Preheat the oven to 375°F (190°C) with a rack positioned in the centre. Line two baking sheets with parchment paper. Using a cookie scoop or a tablespoon, portion the dough into balls approximately 40 g / 1.5 oz each, spacing them about 2 inches (5 cm) apart on the prepared sheets. Do not flatten. Finish each ball with a small pinch of flaky sea salt pressed lightly into the top — the salt will contrast with the sweetness and highlight the toasted notes from the browned butter. Bake one sheet at a time for 11 to 13 minutes, until the edges are set and beginning to turn golden while the centres still appear slightly underdone and glossy. This is correct. The cookies will continue to set as they cool on the pan. Remove from the oven and allow them to rest on the baking sheet for 5 minutes before transferring to a wire rack.
Chef's tip
The single most common mistake with this dough is pulling the butter off the heat too early — before the milk solids have reached a deep amber. A pale, golden beurre noisette tastes mild; a properly darkened one tastes complex and specific. Push the colour further than feels comfortable, right to the edge of dark amber, and you will taste the difference immediately. For a spring variation, press a few squares of good dark chocolate into the top of each dough ball just before baking, and serve the warm cookies alongside a glass of cold whole milk or a lightly brewed Earl Grey — the bergamot plays well against the nuttiness of the browned butter.
Pairings
The flavour profile of these cookies — toasted hazelnut, dark caramel, bitter chocolate — calls for beverages that either echo the richness or cut cleanly through it with contrast.
A cold glass of whole milk remains the most direct pairing: the fat content tempers the intensity of the chocolate while its slight sweetness rounds out the salt. For something warm, a dark roast coffee with low acidity — Ethiopian or Sumatran single-origin, brewed as a long black — extends the roasted notes already present in the butter. A tawny port (10-year, served slightly cool) works exceptionally well for an adult occasion, its dried fruit and walnut notes harmonising with the molasses in the brown sugar. For a non-alcoholic option, a cold brew concentrate over ice with a splash of oat milk is an excellent match.
A note on the technique
Browning butter — known in French pastry as beurre noisette, literally "hazelnut butter," named for its colour and aroma rather than any nut content — is one of the oldest flavour-building techniques in European cooking. It appears in French financiers, madeleines, and countless tart shells, where it provides a depth that plain melted butter cannot replicate. The Maillard reaction, the same chemical process responsible for the crust of a well-seared steak or the surface of a toasted loaf, occurs as the milk solids in the butter reach temperatures above 280°F (138°C) and begin to caramelise and transform.
Applied to the American chocolate chip cookie — a recipe that has been relatively stable since Ruth Wakefield developed it at the Toll House Inn in Massachusetts in the 1930s — brown butter is not an innovation so much as a calibration. It asks nothing additional of the baker in terms of ingredients, timing, or equipment beyond attentiveness at the stove. The gap between a standard cookie and one made with properly browned butter is wide enough to notice immediately and narrow enough to be achieved every time.
Nutritional values (per cookie, approximate values)
| Nutrient | Amount |
|---|---|
| Calories | ~195 kcal |
| Protein | ~2 g |
| Carbohydrates | ~26 g |
| Of which sugars | ~17 g |
| Fat | ~10 g |
| Of which saturated | ~6 g |
| Fiber | ~1 g |
| Sodium | ~130 mg |
Frequently asked questions
Can the dough be made ahead of time?
Yes, and it is actively encouraged. The dough keeps well in the refrigerator, covered tightly, for up to 72 hours. Beyond that window, the leavening begins to lose efficiency. For longer storage, portion the dough into balls, freeze them on a parchment-lined tray until solid, then transfer to a freezer bag. Frozen dough balls bake directly from frozen at the same temperature — simply add 2 to 3 minutes to the baking time.
How should finished cookies be stored?
Store baked cookies at room temperature in an airtight container. They will remain soft and flavourful for 4 to 5 days. Placing a small piece of bread in the container helps maintain moisture. Avoid refrigerating baked cookies — the cold environment accelerates staling and firms the chocolate in an unpleasant way. They can be frozen for up to one month and refreshed in a 300°F (150°C) oven for 5 minutes.
What substitutions are possible?
The dark brown sugar can be replaced with light brown sugar for a slightly less intense molasses flavour, though the depth will be reduced. Chopped dark chocolate bars (roughly cut into irregular pieces) outperform standard chips in terms of flavour — the uneven shards create pools rather than dots. For a dairy-free version, a high-quality vegan butter with a significant fat content can be browned using the same method, though the milk solid content varies by brand and the colour development will differ. The flaky salt finish can be swapped for a few grains of coarse turbinado sugar if a sweeter surface is preferred.
Why do the centres look underdone when i pull them from the oven?
That is intentional and correct. Cookies continue to cook on the hot baking sheet for several minutes after leaving the oven — a process called carryover cooking. Removing them when the edges are set but the centres appear glossy and slightly underbaked produces a final cookie that is soft and cohesive rather than dry and crumbly. Overbaking by even two minutes results in a noticeably harder texture once the cookies cool completely. Trust the timing and resist the urge to leave them longer.
My butter burned — what went wrong?
The most likely cause is heat that is too high or a pan that was left unattended. Medium heat and continuous stirring are both non-negotiable. A dark-coloured or non-stick pan also makes it difficult to read the colour of the milk solids — a stainless steel or enamelled saucepan gives a clear view of what is happening at the base. If the butter smells acrid rather than nutty, or the solids have turned black, start over with fresh butter. The cost of one stick of butter is worth the difference in outcome.