

Late March carries that particular restlessness — the days are lengthening, the kitchen still feels like a refuge, and the fruit bowl is often holding two or three bananas that have crossed the line from yellow to deeply speckled brown. This is the moment banana bread was made for. Most classic recipes call for a generous amount of butter, and the result is undeniably rich. But butter, for all its qualities, can produce a crumb that firms up quickly, turning a loaf that was tender on day one into something noticeably denser by day two. Greek yogurt changes that equation in a way that is both simple and backed by solid kitchen chemistry.
This article examines exactly what happens when you replace butter with full-fat Greek yogurt in banana bread — how moisture behaves differently, how the crumb tightens and relaxes, and why the texture holds over several days rather than just a few hours. You will also find a complete recipe, tested for reliability, that uses Greek yogurt as the only fat source alongside a small measure of neutral oil. Tie on your apron: the ripest bananas on your counter are ready.
| Preparation | 15 min |
| Cooking | 55–60 min |
| Rest | 20 min |
| Portions | 8–10 slices |
| Difficulty | Easy |
| Cost | $ |
| Season | Year-round · Ripe bananas |
Suitable for: Vegetarian
Why greek yogurt instead of butter?
Before the recipe itself, it helps to understand the mechanism — because once you understand it, you will apply it instinctively across other quick breads and muffins too. Butter contributes fat, which coats the gluten strands formed during mixing and produces a tender crumb. It also contributes water — roughly 15–18% of its weight — but primarily acts as a solid fat that sets as the loaf cools, which is precisely what causes the texture to contract and harden over time.
Greek yogurt brings a different profile to the same structural role. Its fat content (in full-fat versions, around 8–10%) provides lubrication to the batter, but its water content is substantially higher — and crucially, that moisture is bound within a protein-rich, slightly acidic matrix. This acidity matters. When Greek yogurt meets baking soda, a chemical reaction produces carbon dioxide bubbles. Those bubbles expand in the oven, lifting the loaf from within and creating a lighter, more open crumb than butter alone tends to achieve.
The protein in the yogurt also interacts with the egg proteins and the flour's gluten network during baking. Rather than coating gluten strands the way fat does, protein-rich yogurt reinforces the structure at a microscopic level, producing a crumb that is both soft and sturdy — one that resists the progressive staling that causes butter-based loaves to dry out. The lactic acid in the yogurt further tenderizes the gluten, so the final texture is genuinely soft rather than chewy. Add to this the natural sugars and deep flavour of very ripe bananas, and the result is a loaf that improves slightly on day two as moisture redistributes through the crumb.
One small note on fat: Greek yogurt alone produces a loaf that can feel slightly lean. Adding 3 tablespoons of a neutral oil — sunflower or light olive — restores the mouthfeel of fat without reintroducing butter, and keeps the entire recipe dairy-forward-but-butter-free.
Ingredients
- 3 very ripe bananas (approximately 300 g peeled weight — the skin should be heavily speckled or blackened)
- 200 g full-fat plain Greek yogurt
- 3 tablespoons (45 ml) neutral oil (sunflower or light olive oil)
- 2 large eggs, at room temperature
- 150 g light brown sugar
- 1 teaspoon pure vanilla extract
- 210 g all-purpose flour
- 1 teaspoon baking soda
- ½ teaspoon baking powder
- ½ teaspoon fine salt
- ½ teaspoon ground cinnamon
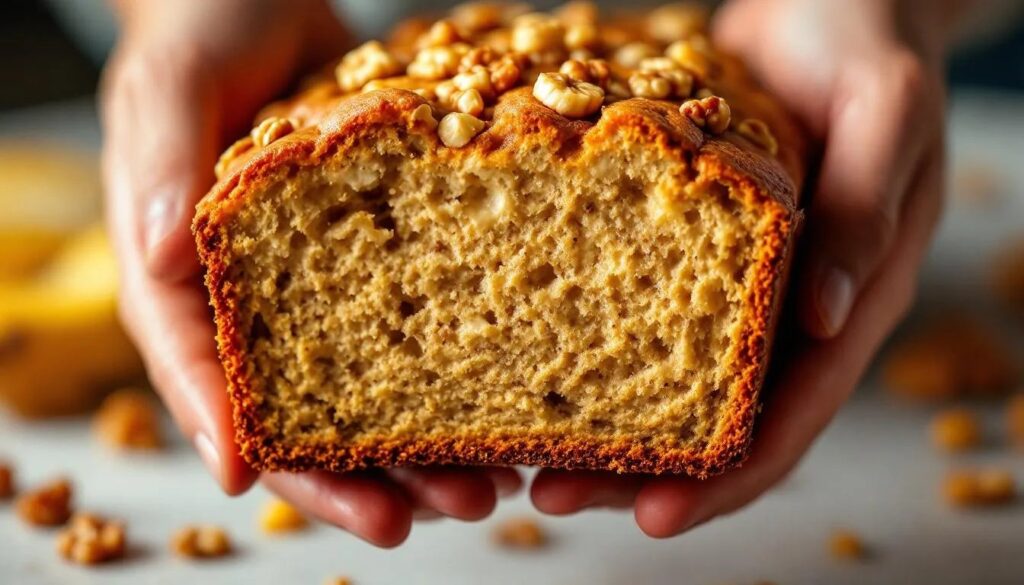
- Optional: 80 g dark chocolate chips or roughly chopped walnuts
Utensils
- 9 x 5-inch (23 x 13 cm) loaf pan
- Two large mixing bowls
- Fork or potato masher
- Whisk
- Rubber spatula
- Kitchen scale
- Wire cooling rack
- Parchment paper
Preparation
1. Prepare the pan and bring ingredients to temperature
Preheat the oven to 175°C / 350°F. Line the loaf pan with parchment paper, leaving an overhang on the two long sides — this creates handles that make unmoulding clean and effortless. Lightly oil any exposed pan edges. If your eggs and Greek yogurt are cold, set them out 20 minutes before starting. Cold dairy proteins do not incorporate as smoothly into batter, and cold eggs can cause the batter to seize slightly, leading to uneven mixing. Room temperature ingredients emulsify cleanly, producing a more uniform crumb throughout the loaf.
2. Mash the bananas
Peel the bananas into a large bowl. Use a fork or potato masher to reduce them to a rough purée — not perfectly smooth, but with no large chunks remaining. A few small lumps are acceptable and add textural interest; streaks of firmer banana through the crumb are pleasant. The bananas should be deeply fragrant at this stage, almost fermented in their sweetness. If they smell strongly of banana and the interior is entirely soft with a slightly darker gold color, they are at exactly the right point. Under-ripe bananas — even fully yellow ones — will produce a loaf that lacks depth of flavour and natural sweetness.
3. Build the wet mixture
To the mashed bananas, add the Greek yogurt, neutral oil, eggs, brown sugar, and vanilla extract. Whisk firmly until the mixture is homogenous — this takes about 60 seconds of active whisking. The batter will look slightly curdled at first as the cold yogurt proteins meet the sugar and eggs, but persistence brings it together into a smooth, glossy, pale-amber mixture. Brown sugar is preferred here over white: its molasses content adds a faint caramel note that reinforces the banana and plays well against the yogurt's mild acidity.
4. Combine the dry ingredients separately
In the second bowl, combine the flour, baking soda, baking powder, salt, and cinnamon. Whisk briefly to distribute the leavening agents evenly through the flour. This step matters more than it appears: pockets of undissolved baking soda can create an alkaline, soapy taste in the finished loaf, and concentrated baking powder creates bitter spots. Whisking the dry ingredients together first ensures even distribution without the risk of overmixing — the term for working flour too aggressively once liquid is added, which develops excess gluten and produces a tough, tunnelled crumb.
5. Fold wet into dry — with restraint
Pour the wet mixture into the bowl of dry ingredients. Using a rubber spatula, fold from the bottom of the bowl upward, rotating as you go. Stop the moment no dry streaks of flour remain visible — typically 12 to 15 folds. The batter should look thick, slightly rough on the surface, and barely smooth. Resist any impulse to keep stirring. If you are adding chocolate chips or walnuts, fold them in now with three or four additional strokes. The texture of the raw batter at this stage is genuinely predictive: if it looks slightly lumpy and ribbons off the spatula slowly, the baked loaf will have the open, moist crumb you are after.
6. Bake to a deep golden crust
Pour the batter into the prepared pan and smooth the surface gently with the spatula. For a bakery-style split down the center of the crust — that characteristic ridge that rises proudly as the loaf bakes — draw a thin line of neutral oil along the length of the surface before placing the pan in the oven. Bake at 175°C / 350°F for 55 to 60 minutes. The loaf is ready when the crust is a deep, even amber-brown, the split ridge has risen and set, and a wooden skewer inserted into the centre comes out with a few moist crumbs — not wet batter, but not bone dry either. Begin checking at the 50-minute mark. If the top is browning too quickly, tent it loosely with a sheet of foil.
7. Rest before slicing
Remove the pan from the oven and let the loaf rest in the pan for 10 minutes — the carryover heat continues setting the crumb structure during this window. Then lift the loaf out using the parchment handles and transfer it to a wire rack for a further 10 minutes before slicing. Cutting too early releases steam before it has redistributed through the crumb, and the interior will appear gummy even when properly baked. The patience here is worth it: the crumb, once rested, slices cleanly and holds its structure on the knife.
My chef's note
The single most reliable way to guarantee a moist banana bread is to commit to genuinely overripe fruit. A banana that looks almost too far gone — black-skinned, soft to the point of collapse, intensely aromatic — contains twice the free sugars of a yellow banana, and those sugars carry flavour and attract moisture throughout the bake. If your bananas are not there yet, place them unpeeled on a baking sheet in a 150°C oven for 20 minutes: the skin will blacken and the interior will soften and sweeten rapidly. For the yogurt, avoid low-fat or non-fat versions — their lower protein and fat content produces a noticeably wetter batter that can struggle to set in the center. Full-fat Greek yogurt is the ingredient doing the structural work here, and it is not a place to economize.
Pairing
Banana bread's flavour profile — warm spice, caramel sweetness, a background lactic tang from the yogurt — pairs well with drinks that offer either contrast or complementarity. A long black coffee or a flat white is the natural pairing: the bitterness of espresso sharpens the perception of sweetness in the loaf and cuts through the dense crumb in a way that feels like punctuation. For an afternoon context, a lightly steeped Ceylon tea — bright, malty, and low in tannin — is a gentler companion that does not compete with the banana's aromatic sweetness.
For an occasion that calls for something more considered, a small glass of Pedro Ximénez sherry — dense, raisin-sweet, with notes of fig and molasses — mirrors the banana's caramel depth in a way that is quietly remarkable. Serve it cool, not cold, in a small copita glass alongside a thick slice. For those preferring no alcohol, a cold brew coffee with a touch of oat milk achieves a similar register of roasted-sweet contrast.
Context: the quick bread tradition and its quiet evolution
Banana bread as a recognizable recipe appeared in American home-cooking manuals during the 1930s, when chemical leavening — baking soda and baking powder — had become standard pantry items and overripe bananas needed a purpose beyond the compost bin. The formula was practical, economical, and forgiving: a batter that required no yeast, no proofing time, and no particular technique, only a bowl, a pan, and an oven. Its rise in popularity during the mid-twentieth century coincided with the increasing availability of commercial baking ingredients across the country.
The version with butter became canonical — partly because butter was the default baking fat of the era, and partly because its flavor is genuinely complementary to banana. But the classic recipe was always subject to variation: oil appeared as a substitute in regions where butter was expensive, and yogurt or sour cream entered home kitchens as cooks discovered that acidic dairy produced a noticeably lighter crumb. The contemporary interest in Greek yogurt as a baking ingredient is not innovation so much as it is rediscovery, applied with the benefit of a clearer understanding of why it works. The loaf that results — moist, lightly tangy, structurally sound over three days — is a direct continuation of that long, quietly practical tradition.
Nutritional values (per slice, based on 10 slices, approximate values)
| Nutrient | Amount |
|---|---|
| Calories | ~210 kcal |
| Protein | ~6 g |
| Carbohydrates | ~34 g |
| of which sugars | ~17 g |
| Fat | ~6 g |
| Fiber | ~1.5 g |
Frequently asked questions
Can this banana bread be made ahead of time?
Yes — and it is arguably better on day two. Once fully cooled, wrap the loaf tightly in plastic wrap or store it in an airtight container at room temperature. The moisture from the Greek yogurt continues to distribute through the crumb overnight, producing a texture that is softer and more cohesive than it was the day it was baked. Slice only as needed to preserve the interior moisture of the remaining loaf.
How should leftovers be stored, and how long do they keep?
At room temperature, tightly wrapped, the loaf keeps well for up to 3 days. In the refrigerator, it will last up to 5 days, though refrigeration tends to dry out the crumb slightly — bring slices to room temperature before eating, or warm them briefly in a toaster. For longer storage, the loaf freezes exceptionally well: slice it before freezing, wrap individual slices in plastic wrap, and store them in a zip-lock freezer bag for up to 3 months. Slices defrost at room temperature in about 30 minutes.
What substitutions work if full-fat Greek yogurt is unavailable?
Full-fat sour cream is the closest direct substitute and will produce nearly identical results — the fat and acidity levels are comparable. Plain whole-milk kefir can also work, though the batter will be slightly thinner and the bake time may need to increase by 3–5 minutes. Skyr (Icelandic-style strained yogurt) functions similarly to Greek yogurt and is a straightforward one-to-one swap. Low-fat or non-fat Greek yogurt is not recommended: the reduced fat content weakens the crumb structure and can leave the center underbaked despite the crust appearing done.
Can the recipe be made gluten-free?
A cup-for-cup gluten-free flour blend — one that includes xanthan gum — can replace the all-purpose flour at a one-to-one ratio. The crumb will be slightly denser and the loaf may require an additional 5 minutes of baking, but the structure holds reasonably well because the Greek yogurt's protein network partially compensates for the absence of gluten. Check for doneness with a skewer rather than relying solely on bake time, as gluten-free batters can appear set on the outside while remaining soft at the centre.
Why did my loaf sink in the middle after baking?
A sunken center usually points to one of three causes: underbaking (the structure had not fully set when the loaf was removed from the oven), excess moisture in the batter (often caused by low-fat yogurt or bananas that were not properly mashed), or overmixing (which creates large gas pockets that inflate and then collapse). Check that your baking soda is fresh — open a new package if yours has been in the pantry longer than six months — and ensure the skewer test genuinely comes back with only moist crumbs, not wet batter, before pulling the loaf from the oven.