
Easter arrives at the end of March this year, and with it comes one of the most quietly spectacular baking rituals in the British calendar: the making of hot cross buns. The kitchen fills with warm spice — cinnamon, mixed peel, a hint of nutmeg — long before the buns ever reach the oven. What separates a forgettable bun from one that lingers in the memory is almost always the same thing: time. Specifically, a cold, slow overnight rest in the refrigerator, where the dough transforms in ways that a two-hour countertop rise simply cannot replicate.
This recipe takes the classic Easter hot cross bun and builds in that overnight cold fermentation as a non-negotiable step. The result is a dough that is easier to shape, a crumb that is more open and tender, and above all, a depth of flavour — slightly tangy, warmly spiced, with a faint caramel note from the brown sugar — that marks the difference between bread and something genuinely worth waking up for on a spring morning. Tie on your apron and clear space in the fridge before you go to bed tonight.
| Preparation | 40 min |
| Rest (cold fermentation) | 10–14 hours (overnight) |
| Second rise | 1 hour 30 min |
| Baking | 22–25 min |
| Portions | 12 buns |
| Difficulty | Medium |
| Cost | £ / AU$ |
| Season | Spring — Easter; dried fruit, orange zest, warming spices |
Suitable for: Vegetarian
Ingredients
For the dough
- 500 g strong white bread flour, plus extra for dusting
- 7 g fast-action dried yeast (1 standard sachet)
- 75 g light brown sugar
- 1 tsp fine sea salt
- 2 tsp ground cinnamon
- 1 tsp mixed spice
- ¼ tsp freshly grated nutmeg
- 250 ml whole milk, warmed to around 38°C (100°F)
- 60 g unsalted butter, softened and cut into cubes
- 2 large eggs, beaten
- 150 g mixed dried fruit (currants, sultanas, raisins — or a combination)
- 60 g mixed candied peel, finely chopped
- Zest of 1 unwaxed orange
For the cross paste
- 75 g plain flour
- 6–7 tbsp cold water
For the glaze
- 3 tbsp apricot jam (or golden syrup)
- 1 tbsp hot water
Utensils
- Large mixing bowl or stand mixer with dough hook
- Kitchen scales
- Instant-read or probe thermometer
- Cling film or beeswax wrap
- Large baking tray (approximately 30 × 40 cm / 12 × 16 in)
- Baking parchment
- Piping bag with a small plain nozzle (or a zip-lock bag with one corner snipped)
- Pastry brush
- Wire cooling rack
- Microplane or fine grater (for nutmeg and orange zest)
Preparation
1. Build the enriched dough
Combine the bread flour, yeast, light brown sugar, salt and all three spices in the bowl of a stand mixer. Keep the yeast and salt on opposite sides of the bowl at first — direct contact between the two can inhibit fermentation. Warm the milk to approximately 38°C: this is body temperature, barely warm against the inside of your wrist, and the ideal environment in which yeast becomes active without being killed by excess heat. Pour the warm milk and beaten eggs into the dry ingredients, then mix on a low speed for 2 minutes until a shaggy dough forms. Increase to medium speed and add the softened butter, a few cubes at a time, waiting for each addition to be fully incorporated — absorbed and no longer visible — before adding the next. This process takes patience: roughly 8–10 minutes in total. The dough is ready when it pulls cleanly away from the bowl's sides and feels smooth and slightly tacky, never sticky enough to coat your palm fully.
2. Incorporate the fruit
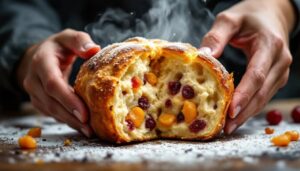
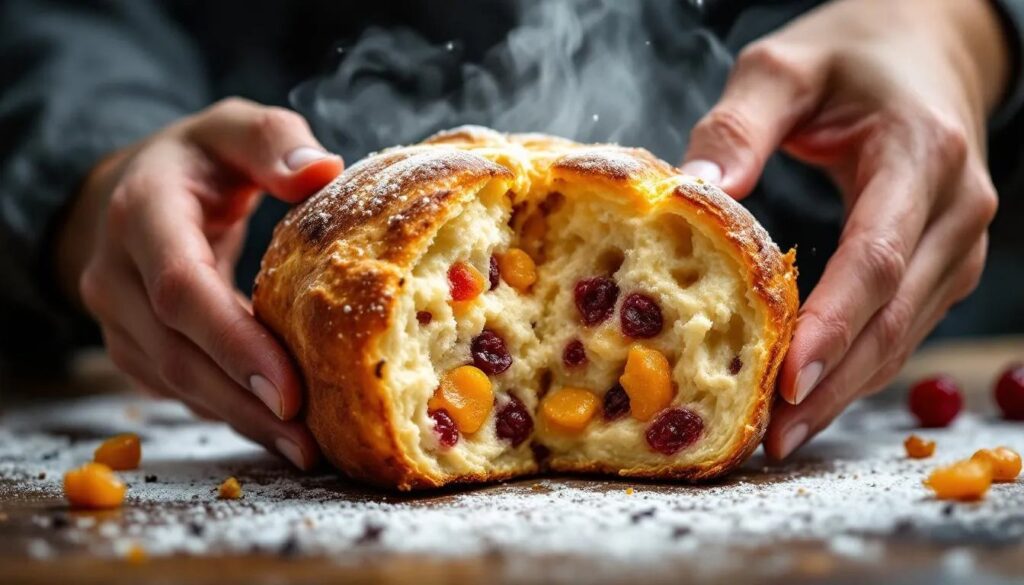
Reduce the mixer to its lowest speed and add the dried fruit, candied peel and orange zest. Mix for no more than 2 minutes: the goal is even distribution, not further gluten development. If you are working by hand, turn the dough onto a lightly floured surface and fold the fruit in using a stretch-and-fold technique — stretching one edge of the dough out, folding it back over the centre, rotating 90 degrees and repeating — until the fruit is evenly dispersed throughout. The dough will feel noticeably enriched: pliant, faintly glossy from the butter and eggs, dotted with deep-coloured fruit.
3. The overnight cold fermentation — the step that changes everything
Shape the dough loosely into a ball, place it in a lightly oiled bowl and cover tightly with cling film. Let it rest at room temperature for 30 minutes — just long enough for fermentation to begin — then transfer the bowl to the refrigerator and leave it for 10 to 14 hours, ideally overnight. Cold fermentation is the technique at the heart of this recipe. At low temperatures, yeast works far more slowly, and as it does, it produces a broader spectrum of flavour compounds: organic acids that lend a gentle depth, complex esters that enhance the spice, and carbon dioxide that creates a finer, more even crumb structure. The cold also firms the butter within the dough, making the dough significantly easier to divide and shape cleanly the following morning.
4. Divide and shape
Remove the dough from the refrigerator and allow it to sit at room temperature for 20 minutes — this relaxes the gluten, which will have tightened in the cold, and brings the dough to a workable temperature. Turn it out onto a very lightly floured surface. Divide it into 12 equal pieces, each weighing approximately 90–95 g: use your scales for consistency rather than guessing by eye. To shape each piece, cup your hand over the dough and apply gentle but firm circular pressure against the work surface — a technique known as rounding — until each piece forms a tight, smooth ball with a clearly defined surface tension. A taut skin on the surface will help the buns hold their shape and rise upward rather than spreading outward.
5. The second rise
Line your baking tray with parchment and arrange the shaped buns in a 3 × 4 grid, leaving approximately 1 cm of space between each. As they prove and bake, they will expand to touch one another — this is intentional, as the contact along the sides keeps the buns soft and encourages height rather than spread. Cover loosely with oiled cling film or a clean damp kitchen towel and leave in a warm, draught-free place for 1 hour 30 minutes, until visibly puffed and when one is pressed lightly with a fingertip, the indent springs back slowly — the classic sign of a fully proved dough. Meanwhile, preheat your oven to 200°C fan / 220°C conventional / 425°F.
6. Pipe the crosses
Prepare the cross paste by mixing the plain flour with cold water, adding the water one tablespoon at a time, whisking after each addition, until you have a smooth, thick paste that holds its shape when piped but still flows. It should resemble a stiff glue: if it runs off the spoon too freely, add a little more flour; if it cracks when squeezed, add water a teaspoon at a time. Transfer to a piping bag fitted with a small plain nozzle (around 3–4 mm). Pipe a single continuous line lengthwise down each row of buns, then repeat in the perpendicular direction, so that every bun receives a clean cross. Work with a steady, even pressure and hold the nozzle just above the surface — contact with the dough will drag the paste.
7. Bake
Slide the tray into the centre of the preheated oven and bake for 22–25 minutes, until the buns are a deep amber-gold on top and sound hollow when the underside of one is tapped firmly — an audible, resonant knock rather than a dull thud. The crosses should be cream-coloured and just firm, not browned. If the tops colour too quickly before the buns are cooked through, loosely tent the tray with a sheet of foil for the last 5 minutes.
8. Glaze while hot
Warm the apricot jam with the hot water in a small saucepan over low heat, stirring until the jam melts to a liquid. Strain through a fine sieve if the jam contains large fruit pieces. Transfer the cooled buns to a wire rack immediately after removing from the oven — leaving them in the tray traps steam and softens the base — and brush the glaze generously across the top of each bun while they are still hot. The glaze sets as the buns cool, leaving a translucent, gently sticky finish that catches the light and seals in moisture.
My baker's tip
The spice balance in a hot cross bun is a personal signature. The recipe above is balanced toward warmth rather than heat — if you want a more pronounced note of spice, increase the mixed spice to 1½ teaspoons and add a small pinch of ground cloves. At this time of year, when the first blood oranges of late winter are giving way to navel oranges, the zest alone adds a brightness that amplifies every other flavour in the dough. If you can find unwaxed oranges at a market stall, their zest will be far more aromatic than packaged alternatives. The crosses, often overlooked, also benefit from a small addition: a tiny pinch of fine salt in the paste sharpens the contrast between crust and crumb.
Pairing suggestions
Hot cross buns occupy the meeting point between bread and enriched pastry, which makes them surprisingly versatile at the table. Their warm spice and gentle sweetness ask for something that either complements or cuts cleanly through them.
Served warm with good unsalted butter, they pair naturally with a pot of Darjeeling first flush — a spring-harvest tea with a floral, slightly muscatel character that echoes the orange zest in the dough. For a more indulgent pairing, a small glass of chilled Pedro Ximénez sherry — intensely figgy, with notes of dried fruit and caramel — mirrors the currants and mixed peel without overwhelming the spice. Those who prefer to avoid alcohol will find that a cardamom-spiced oat milk latte, or simply very good black coffee, makes an equally considered companion.
The story behind hot cross buns
Hot cross buns are among the oldest documented spiced breads in the English-speaking world, with roots that predate the printed recipe by several centuries. The cross itself has been interpreted both as a Christian symbol marking Good Friday and as a much older, pre-Christian marker used to divide bread into portions. By the Tudor period, spiced buns marked with a cross had become so closely associated with religious observance that a proclamation under Elizabeth I restricted their sale to funerals, Good Friday and Christmas — a measure of just how charged a simple bun could be. The connection to Easter Friday has held ever since, and the tradition of baking or buying hot cross buns on Good Friday morning is one of the most consistent food rituals in the British year.
Regionally and internationally, variations diverge sharply. In Australia and New Zealand, hot cross buns appear in supermarkets from January onward, and flavour variations — chocolate chip, apple and cinnamon, even salted caramel — are standard commercial offerings. Traditionalists in the United Kingdom and Ireland maintain that mixed peel and currants are non-negotiable, and that anything else constitutes a different bun entirely. Both positions have their merits. The version here sits firmly in the traditional camp, with the cold fermentation technique borrowed from modern bread-making, where retarding dough overnight has become standard practice in artisan bakeries.
Nutritional values (per bun, approximate values)
| Nutrient | Amount |
|---|---|
| Calories | ~285 kcal |
| Protein | ~7 g |
| Carbohydrates | ~50 g |
| of which sugars | ~18 g |
| Fat | ~7 g |
| of which saturates | ~4 g |
| Fibre | ~2 g |
| Salt | ~0.4 g |
Frequently asked questions
Can the dough be made further in advance — two days ahead, for example?
Yes, with one caveat: after 24 hours in the refrigerator, yeast activity continues even at low temperatures, and the dough may overprove, developing an overly sour flavour and a weaker gluten structure. If you need to work more than a day ahead, divide and shape the buns after the cold rest, arrange them on the tray, then cover and refrigerate overnight again. Remove them the following morning and allow them to come to room temperature and complete their second rise before baking. This two-stage cold approach works well and can actually improve crumb structure further.
Can the dough be frozen, and at what stage?
The best point to freeze is after shaping: place the shaped, raw buns on a parchment-lined tray, freeze them until solid (about 2 hours), then transfer to a zip-lock bag or airtight container. They keep well for up to 8 weeks. To use, arrange the frozen buns on your prepared baking tray, cover, and allow them to thaw and prove at room temperature for 3–4 hours before piping the crosses and baking as directed. Baked buns can also be frozen once fully cooled and glazed — reheat from frozen in a 160°C oven for 10 minutes.
Why did my buns spread flat rather than rise upward?
Flat buns are almost always the result of one of three things: overproving during the second rise, which causes the gluten network to weaken and collapse; underproving, which means insufficient gas development and no structure to hold the shape; or a dough that was too warm when shaped, preventing the butter from providing the structural support it should. The cold fermentation in this recipe specifically addresses the latter: a cold dough is considerably easier to shape tightly and holds its form far better through the second rise. If spreading persists, reduce the spacing between buns slightly on the tray — the mutual support as they bake encourages height.
What substitutions work for the dried fruit?
The mixture is very flexible. Currants can be replaced entirely with dried cranberries for a more tart, modern flavour — particularly fitting for an Easter table where they pair well with the orange zest. Chopped dried apricots work well in place of mixed peel if candied peel is difficult to source. Chocolate chip hot cross buns — a controversial but popular variation — can be made by replacing half the dried fruit with dark chocolate chips (at least 70% cocoa solids) and omitting the candied peel. The spice levels remain unchanged: cinnamon and chocolate are natural partners.
How should leftover buns be stored and reheated?
Enriched doughs stale more slowly than lean breads, but hot cross buns are still best eaten on the day they are baked, or the following morning. Store them in an airtight container or a clean bread bag at room temperature for up to 2 days. To refresh a bun that has lost its softness, slice it in half and toast the cut sides under a grill or in a toaster — the interior stays soft while the cut surface becomes lightly crisp. A thin spread of good salted butter on the warm, toasted cut face is the simplest and most honest way to eat one.