


Spring is the season of simplicity — and nothing captures that spirit quite like making ricotta at home with little more than a pot, some milk, and a lemon. As markets fill with the first strawberries and the days stretch longer, there is something quietly satisfying about transforming three pantry staples into a fresh, pillowy cheese in less time than it takes to set a dinner table. Store-bought ricotta can be grainy, watery, or oddly sweet; homemade is a different creature entirely — dense yet tender, rich with a faint milky tang, ready to carry whatever flavor you bring to it.
This method requires no rennet, no starter culture, and no specialist equipment. Whole milk curdles gently under the heat and the acidity of fresh lemon juice, separating into soft white curds and translucent whey with almost no intervention from you. What you are left with is a ricotta that can move from sweet to savory in seconds: spread onto sourdough with a drizzle of honey, spooned into a spring pasta with peas and mint, or dolloped over roasted asparagus just pulled from the oven. The recipe below walks you through every step, with the reasoning behind each gesture so you understand not just the what but the why. Tie on your apron — this one is worth it.
| Preparation | 5 min |
| Cooking | 15 min |
| Resting | 10–20 min |
| Yield | approx. 300 g (generous 1¼ cups) |
| Difficulty | Easy |
| Cost | $ |
| Season | Year-round · pairs beautifully with spring peas, asparagus, lemon, strawberries |
Suitable for: Vegetarian · Gluten-free · Rich in protein
Ingredients
- 1 liter (4 cups) whole milk, full-fat — not UHT if avoidable
- 3 tablespoons (45 ml) freshly squeezed lemon juice (roughly 1½ lemons), strained
- ½ teaspoon fine sea salt
Equipment
- Heavy-bottomed medium saucepan (at least 2 liters capacity)
- Instant-read or probe thermometer
- Fine-mesh strainer or colander
- Cheesecloth or a clean, thin cotton kitchen towel
- Large bowl (to catch the whey)
- Ladle or large spoon
Preparation
1. Set up your draining station
Before heating anything, prepare your straining setup. Line the fine-mesh strainer with two layers of cheesecloth — or a clean, damp cotton kitchen towel, which works just as well — and set it over a large bowl deep enough to hold the whey without the strainer touching the liquid. Having this ready before the milk reaches temperature means you lose no time once the curds form, which matters because curds that sit in hot acidic whey too long can turn rubbery. Place it near the stove within easy reach.
2. Heat the milk low and steady
Pour the whole milk and the salt into the saucepan and place it over medium heat. Stir gently every minute or so with a large spoon, using slow circular sweeps across the bottom of the pan to prevent any scorching. Watch the surface: at first, small bubbles appear around the edges, then a light foam begins to develop. You are aiming for 88–90°C (190–195°F) — just below a full boil, at the point where the milk steams heavily and shimmers but does not yet roll. Using a thermometer here is not pedantry; the temperature window for optimal curd formation is narrow, and ten degrees too high pushes the milk into a hard, grainy texture. If you do not have a thermometer, look for a vigorous steam and tiny bubbles breaking the surface continuously across the whole pot — not just the edges.
3. Add the lemon juice and stop stirring
Remove the pan from the heat or turn it down to the lowest possible setting. Pour in all three tablespoons of lemon juice in one steady stream, then give the mixture a single, slow stir — just two or three full rotations — and put the spoon down. This is the moment that defines the texture of your ricotta: the acid from the lemon drops the pH of the milk abruptly, causing the casein proteins to unfold and bond with one another, forming the soft white curds you are after. Continued agitation at this stage breaks those fragile bonds before they can set, giving you a coarser, less cohesive result. Leave the pot completely undisturbed for 5 minutes. You will see the surface transform: the milky opacity gives way to a yellowish-green translucent whey, and soft white islands of curd appear and thicken.
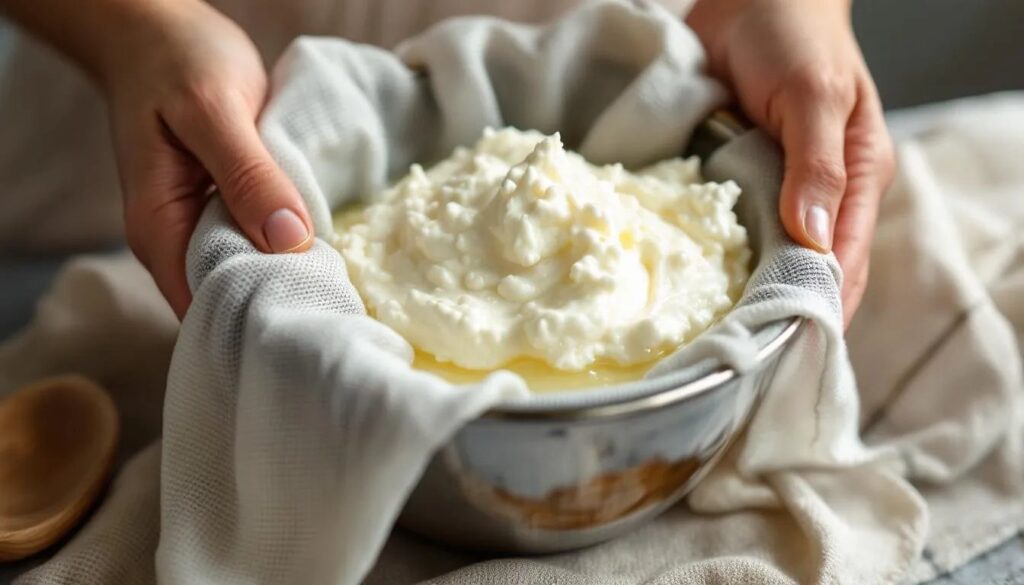
4. Ladle the curds into the strainer
Using a ladle or large spoon, transfer the curds gently from the pot into the cheesecloth-lined strainer. Work slowly, scooping from the surface downward, trying not to break the curds more than necessary — their size directly affects the final creaminess. Once the bulk of the curds is transferred, pour the remaining whey and any smaller curds through the strainer in one slow pour. The liquid that collects in the bowl below — the whey — is a cloudy pale green and is entirely usable: it makes an excellent base for bread, soup, or smoothies, and it is a waste to discard it.
5. Drain to your preferred texture
How long you leave the ricotta to drain determines its final consistency. For a soft, spreadable ricotta — the kind that billows onto toast or melts into warm pasta — drain for 10 minutes only, while it is still warm. For a firmer, scoopable texture suited to stuffed pasta, tarts, or cheesecakes, let it sit for 20–30 minutes or refrigerate the strainer-over-bowl setup for up to an hour. Do not rush this stage by pressing or squeezing the cheesecloth; gravity is gentler and preserves the texture. Once drained to your liking, transfer the ricotta to a clean bowl. Taste and adjust the salt if needed.
My chef's tip
The single most important variable in this recipe is the milk. Avoid ultra-pasteurized (UHT) milk whenever possible — the high-heat treatment it undergoes before bottling denatures the proteins, making them far less willing to form curds. Look for standard pasteurized whole milk with the highest fat content available; in spring, some farms and specialty grocers carry fresh non-homogenized milk with a cream line, which produces a noticeably richer, more unctuous result. If you only have UHT milk on hand, add an extra half tablespoon of lemon juice to compensate. As the season moves toward summer, try substituting half the lemon juice with white wine vinegar — it produces a slightly milder, sweeter curd that works beautifully with ripe tomatoes and torn basil.
Serving & pairing suggestions
Fresh ricotta has a clean, milky acidity and a fat-rich creaminess that bridges the sweet-savory divide with ease. In late March, it is at home in either direction depending on what you bring to the table.
On the savory side, serve it at room temperature on grilled sourdough with shaved raw asparagus, a thread of good olive oil, and a little flaky salt — the bitterness of the asparagus plays against the cheese's softness cleanly. Stirred through hot pasta with spring peas, lemon zest, and torn mint, it melts into a sauce without any cream. For a sweet finish, spoon it into a bowl with the first strawberries of the season, a drizzle of wildflower honey, and a few black pepper cracks. To drink, a glass of cold Vermentino from Sardinia or a dry Alsatian Pinot Blanc — both with enough acidity to echo the lemon — complements the cheese without overwhelming it. For a non-alcoholic match, a still sparkling water with a slice of lemon keeps the palate clean between bites.
A little history
The word ricotta comes from the Latin recocta, meaning "recooked" — a reference to the traditional method of making it from the whey left over after producing other cheeses such as mozzarella or pecorino. Whey ricotta, the original version, is technically not a cheese at all but a latticino, a dairy by-product, made by reheating whey until the remaining albumin proteins coagulate. The homemade whole-milk version in this recipe follows a slightly different logic — it uses fresh milk rather than whey — but arrives at a result close enough in texture and flavor to be considered its direct domestic heir.
Ricotta has been produced across Italy for centuries, and each region claims its own interpretation: the dense, dry ricotta salata of Sicily used grated over pasta; the baked ricotta infornata of Calabria with its brown crust; the ricotta di bufala of Campania made from buffalo milk whey, richer and slightly gamey. The whole-milk lemon method now widespread in home kitchens across the English-speaking world is a practical adaptation — it requires no by-products, no specialized culture, and no waiting. It is the ricotta of weeknight cooking and spring improvisation, and it is none the worse for that.
Nutritional values (per serving, approx. 75 g — values approximate)
| Nutrient | Amount |
|---|---|
| Calories | ~130 kcal |
| Protein | ~7 g |
| Carbohydrates | ~5 g |
| of which sugars | ~5 g |
| Fat | ~9 g |
| of which saturated | ~6 g |
| Fiber | ~0 g |
| Calcium | ~150 mg |
Frequently asked questions
Why isn't my milk curdling?
The most likely cause is ultra-pasteurized (UHT) milk, which has been heat-treated at such high temperatures that its proteins no longer respond reliably to acid. Switch to standard pasteurized whole milk. If UHT is all you have, increase the lemon juice to 4–4½ tablespoons and make sure the milk reaches at least 88°C (190°F) before adding the acid. Also check that your lemon juice is truly fresh — bottled juice is often too diluted to do the job effectively.
Can I make this ahead of time?
Yes. Homemade ricotta keeps well in an airtight container in the refrigerator for up to 3 days. Its texture will firm slightly as it cools, which can actually be an advantage for recipes that need a more structured cheese. If you want it back to its original softness, let it sit at room temperature for 20 minutes before serving and stir in a teaspoon of whole milk if needed.
Can I substitute the lemon juice with something else?
Absolutely — the lemon juice is acting purely as an acid to lower the milk's pH, so any food-safe acid can step in. White wine vinegar produces a milder, slightly sweeter curd. Apple cider vinegar adds a faint fruity note. Distilled white vinegar is the most neutral of all and gives a very clean result. Use the same quantity — 3 tablespoons per liter of milk — as a starting point, then adjust based on how your milk responds. Some batches need a touch more; add half a tablespoon at a time and wait a full minute before deciding.
What can I do with the leftover whey?
The pale green whey left in your bowl is protein-rich and subtly tangy — too good to pour away. Use it in place of water when making bread or pizza dough, where it adds depth and helps with browning. It works equally well as the liquid base for a vegetable soup or a pot of rice. Stored in a sealed jar in the fridge, it keeps for up to 5 days. In spring, try using it to cook a pot of orzo with fresh peas — the whey adds a quiet dairy richness without any heaviness.
Can I make ricotta with lower-fat or plant-based milk?
Lower-fat dairy milk (2% or semi-skimmed) will curdle but produces a noticeably thinner, drier result with less body. It can work in a pinch for recipes where the ricotta is mixed into something else. Plant-based milks present a real challenge: most do not contain the casein proteins that respond to acid. Full-fat oat milk and cashew milk occasionally produce very soft, loose curds, but the yield is poor and the texture is inconsistent. For a reliable plant-based fresh cheese, a dedicated recipe using cashews and an entirely different technique is a more rewarding path.