


There's a confession most home cooks won't make at the dinner table: sometimes, the best mashed potatoes they've ever tasted didn't start with a pot of boiling water and a bag of fresh spuds. They started with a bag of instant flakes. My aunt figured this out years ago, and she's been quietly winning every family gathering since – Thanksgiving, Sunday roasts, casual midweek dinners where comfort food is the only agenda. Her mashed potatoes arrive at the table impossibly smooth, rich, and layered with flavour that makes you assume she spent an hour peeling, boiling, and ricing. She didn't.
Her method is disarmingly simple. She treats bagged instant mashed potatoes not as a finished product, but as a blank canvas – a starchy base that absorbs butter, cream, garlic, and seasoning more evenly than hand-mashed chunks ever could. The result is a texture so velvety it rivals restaurant-quality pomme purée, and it takes roughly twelve minutes from packet to plate. Here's exactly how she does it, with every detail she's shared over the years, so you can pull this off in your own kitchen tonight.
| Preparation | 5 min |
| Cooking | 7 min |
| Servings | 4–6 people |
| Difficulty | Easy |
| Cost | $ |
| Season | Year-round — pairs well with autumn and winter roasts |
Suitable for: Vegetarian · Nut-free
Ingredients
For the mash base
- 200 g instant mashed potato flakes (plain, unseasoned variety preferred)
- 360 ml whole milk
- 240 ml chicken stock (or vegetable stock for vegetarian)
- 80 g unsalted butter, cut into cubes
- 80 ml thickened cream (heavy cream)
For the flavour build
- 3 cloves garlic, finely minced
- 30 g cream cheese, at room temperature
- 2 tablespoons sour cream
- ¾ teaspoon fine sea salt, plus more to taste
- ¼ teaspoon white pepper
- 1 tablespoon chives, finely snipped (for finishing)
Utensils
- Medium heavy-bottomed saucepan
- Wooden spoon or silicone spatula
- Whisk
- Microplane or fine grater (optional, for raw garlic)
Preparation
1. Bloom the garlic in butter
Place the saucepan over medium-low heat and add the cubed butter. Let it melt slowly – you don't want any browning at this stage, just a gentle pool of liquid gold. Once fully melted, add the minced garlic and stir constantly for about 60 seconds, until the garlic smells fragrant and softens without taking on any colour. This step matters more than you'd think. Raw garlic mixed into instant flakes can taste sharp and almost chemical, but gently blooming it in butter – cooking it just enough to mellow its bite – creates a rounded, sweet warmth that infuses the fat itself. The butter becomes garlic butter, and that garlic butter is about to soak into every granule of potato.
2. Heat the liquids together
Pour the milk and chicken stock into the saucepan with the garlic butter. Add the cream and the salt. Stir everything together with a whisk and raise the heat to medium. You want to bring the liquid to a gentle simmer – small bubbles forming around the edges, steam rising steadily – but not a rolling boil. Boiling can cause the milk proteins to scorch on the bottom of the pan and introduce a slightly bitter, burnt note. If you see it bubbling aggressively, pull the pan off the heat for a moment. The liquid should be properly hot, around 80–85°C, because the flakes need that heat to hydrate evenly. Cold or lukewarm liquid is the single biggest reason instant mash turns out gluey or lumpy.
3. Add the flakes off the heat
Remove the saucepan from the burner entirely. This is the move my aunt swears by. Adding instant flakes to liquid that's actively on the heat means the bottom layer can overcook and stick before the top layer has even hydrated. Off the heat, you're in control. Pour the potato flakes in steadily, stirring with the wooden spoon or spatula as you go – not whipping, not beating, just folding in broad, gentle strokes. Within about 30 seconds, the flakes will absorb the liquid and the mixture will thicken dramatically. It will look like mashed potato already, but it's not done. Let it sit in the pan, covered, for 2 full minutes. This resting period allows the starch granules to finish swelling and gives you a much smoother final texture.
4. Build the richness
Uncover the pan and add the cream cheese and sour cream. Stir them in with the spatula, using the same gentle folding motion. The cream cheese adds a subtle tang and a silky body that bridges the gap between "reconstituted" and "made from scratch." The sour cream reinforces that tang and introduces a slight acidity that balances the richness of all that butter and cream. Once both are fully incorporated – no white streaks remaining – add the white pepper. White pepper rather than black serves two purposes: it distributes more evenly through the pale mash, and its flavour is slightly sharper, more aromatic, with a gentle heat that lingers at the back of the palate. Taste the mash now. Adjust the salt. My aunt always says she adds another pinch at this stage, because potatoes absorb salt as they sit.
5. Final texture check and serve
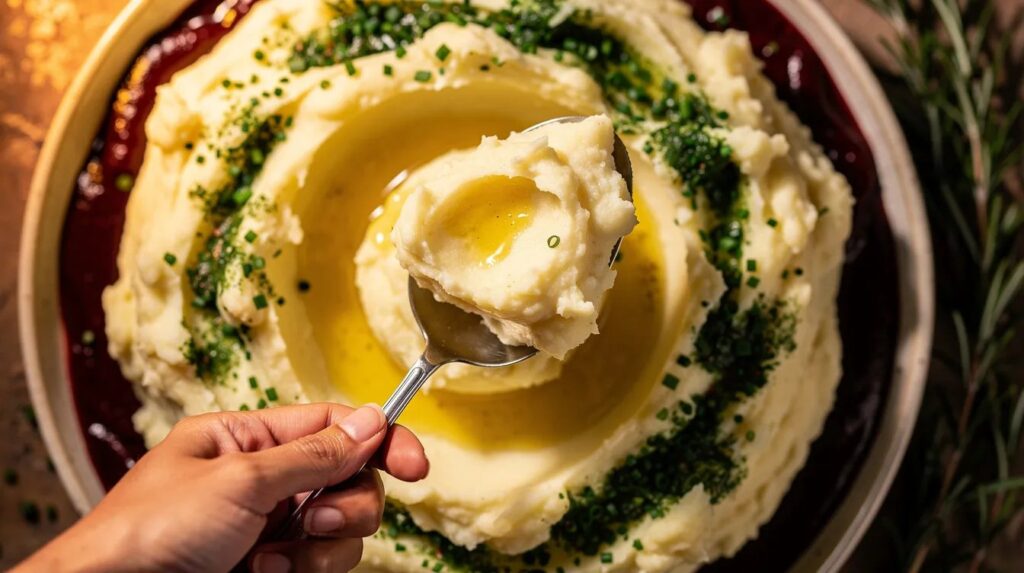
Return the pan to the lowest possible heat for just 60 seconds, stirring continuously. This brief warming ensures the cream cheese and sour cream are fully melted through and brings the mash to a perfect serving temperature without drying it out. The consistency should be thick but spoonable – a spoonful dropped back into the pan should slowly settle and merge back in, not sit in a stiff mound. If it feels too thick, add a splash of warm milk, a tablespoon at a time, and stir. Transfer to a warm serving bowl, dot the surface with a small knob of butter if you like, and scatter the snipped chives over the top. Serve immediately.
My chef's tip
The secret to this hack working is choosing the right instant flakes. Look for a brand that lists potato as the first – and ideally only – ingredient, with no added flavouring, cheese powder, or milk solids. In Australia, brands like Deb or Continental plain varieties work well. The plainer the base, the more control you have. My aunt also warms her serving bowl with hot water before spooning the mash in – it stays hot at the table for a good fifteen minutes longer, which matters when you're carving a roast or waiting for everyone to sit down.
Food and wine pairing
Mashed potatoes are a supporting player, so the pairing depends on what sits next to them. On their own, though, this version – rich, buttery, gently garlicky – favours wines with enough acidity to cut through the fat.
A lightly oaked Chardonnay from the Yarra Valley or Adelaide Hills mirrors the butter and cream while keeping the palate fresh. If red is on the table alongside roast lamb or braised beef, a medium-bodied Pinot Noir from the Mornington Peninsula offers bright cherry fruit and soft tannins that won't clash with the mash's creaminess. For a non-alcoholic option, sparkling water with a squeeze of lemon does the job – the effervescence and acidity cleanse the palate between rich, buttery mouthfuls.
More about this dish
Instant mashed potato flakes were first developed commercially in the 1950s and gained widespread popularity through military rations and the convenience-food boom of the 1960s. For decades, they carried a stigma – the food equivalent of admitting defeat. But professional kitchens have quietly used instant flakes for years, not as a shortcut out of laziness, but as a tool. French chefs sometimes add a small proportion of flakes to fresh purée to tighten the texture and absorb excess moisture. Some high-end pie makers use them to thicken fillings without adding flour.
The trick my aunt uses is really a philosophy: treat convenience products as ingredients, not finished dishes. By replacing the water on the packet instructions with a carefully seasoned mixture of milk, stock, butter, and cream – and by layering in cream cheese, sour cream, and bloomed garlic – she transforms a 90-second side into something guests genuinely ask for the recipe of. She says the look on their faces when she reveals her secret is half the fun.
Nutritional information (per serving, approximate values)
| Nutrient | Amount |
|---|---|
| Calories | ~310 kcal |
| Protein | ~6 g |
| Carbohydrates | ~30 g |
| of which sugars | ~4 g |
| Fat | ~19 g |
| Fibre | ~2 g |
Frequently asked questions
Can I make this ahead of time?
You can prepare the mash up to two hours ahead and keep it in a heatproof bowl set over a pot of barely simmering water, covered with a lid or foil. Stir occasionally and add a splash of warm milk if it thickens. It reheats well in the microwave too – use medium power in 30-second bursts, stirring between each, to avoid hot spots.
How do I store leftovers?
Transfer cooled mash to an airtight container and refrigerate for up to 3 days. Reheat gently on the stove over low heat with a splash of milk, stirring often. The cream cheese and butter content means leftovers stay surprisingly creamy rather than drying out. You can also spread cold leftovers into a baking dish, top with grated cheese, and bake at 190°C for 15–20 minutes for a quick gratin.
What substitutions work well?
For a dairy-free version, swap the butter for a good-quality olive oil or vegan butter, use oat milk in place of dairy milk, and replace the cream cheese and sour cream with a plant-based alternative. The texture will be slightly lighter but still very smooth. For extra flavour in cooler months, try stirring in a tablespoon of wholegrain mustard or a handful of grated aged cheddar at the final stage.
Does it matter which brand of instant flakes I use?
It does. Brands with added seasoning, milk powder, or preservatives will fight against the flavours you're building in. Read the ingredient list and pick the plainest option available – ideally just dehydrated potato and perhaps a small amount of emulsifier. In Australia, Deb Original is widely available and works consistently well.
Can I use this as a topping for shepherd's pie or fish pie?
This mash pipes and browns beautifully under a grill. Let it cool slightly so it's firm enough to spread or pipe, then top your filling and bake or grill at 200°C until golden and bubbling around the edges – roughly 20–25 minutes from the oven, or 5–8 minutes under a hot grill. The cream cheese helps it hold its shape and form crisp, golden peaks.